Advanced Profile Wizard
A scan profile describes how the scan will be done (objectives, channels, exposures, etc). The Advanced Profile Wizard is one way to set up or modify a scan profile.
Brightfield vs Fluorescent Profiles
Brightfield profiles are simpler than Fluorescent profiles. The Advanced Profile Wizard goes through the "same" 6 steps, with differences. This document is going to assume Brightfield, with some notes on differences for fluorescent.
Select a Default Scan Profile.

There is always a default scan profile. If you are going to adapt a profile, select the default profile from the drop down list. If you want to start from scratch, use the gear tool to start a new profile.
Load a slide into the scan position.
The Advanced Scan Profile Wizard really only works if there is a slide in the Pre-Scan position. The easiest way to do this is:
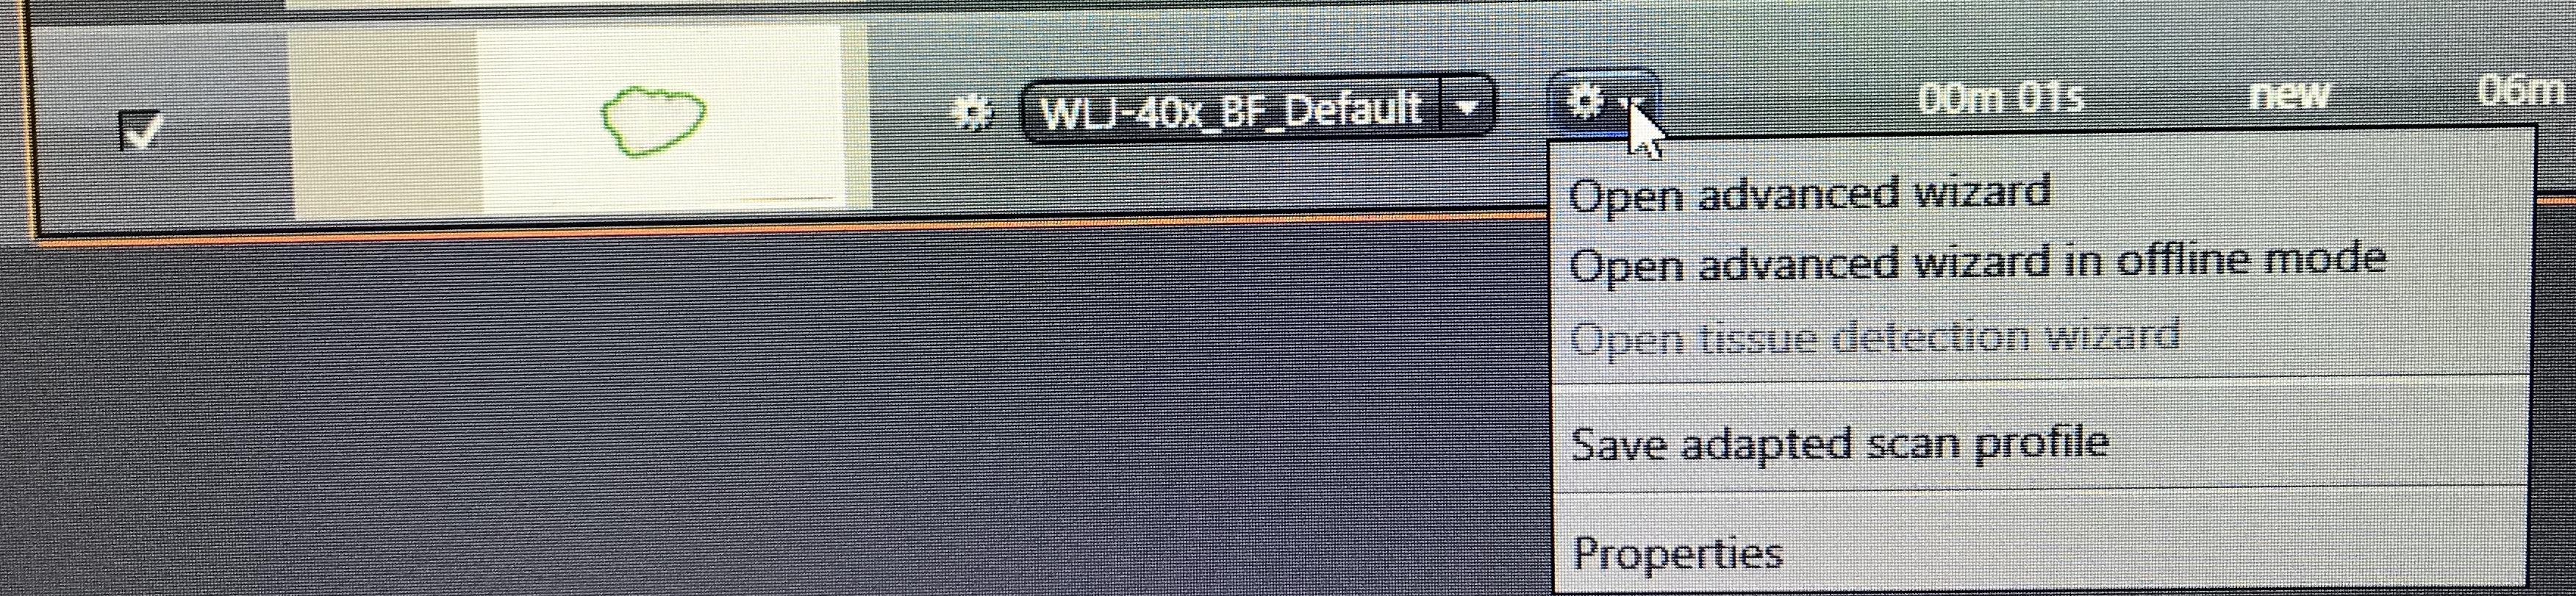
- Select one of the slides in the Magazine. Left click on the Gear Icon for that slide to select Advanced Scan Profile Wizard.


From here, there are 6 steps in the wizard. The steps change depending on the type of scan you are setting up. For details, see the Cell Imaging staff, the instructional videos, or the online manual.
1: Global Data

- Profile name: should be descriptive and should start with your name or initials (and/or lab name).
- Description: optional
- Debug Mode: This will add an overlay layer to your image with the focus points. This can be helpful in diagnosing why scans come out blurry.
- Profile Type: Brightfield or Fluorescence
- This will affect the focus map and scan settings options.
- Tissue Detection Mode:
- Automatic: Let Zen do the detection. If you run preview 1st, you can still edit the tissue selections.
- Manual: Hand draw regions. This can also be used to scan exactly the same area of each slide.
- Interactive: Pause a batch scan after the preview and wait for tissue selection editing.
- Tissue Detection Recognition Type:
- Marker: you have drawn a region(s) on the slide with a Sharpie. This can be especially helpful for fluorescent samples.
- Tissue: This will use the contrast in the image to select the tissue.
- based on image from (i.e., tissue detection is based on an image from) (Only for Fluorescence?)
- Preview Cam: A quick preview. This is the normal mode and used if the tissue is clearly visible.
- Scan Cam: Creates an image with the scan camera and a selected objective. This will also do the Coarse focus map.
- AutoFocus Contrast Type Coarse/Fine: (Only for Fluorescence)
- Channel: Will use one of the channels for the auto focus. Best, if there is a stain (e.g., DAPI) that is fairly evenly seen over the sample.
- RAC: Ring Aperture Contrast. This will use a phase contrast image to focus. Can be useful if fluorophores are sensitive to bleaching. It can also be faster. It seems useful up to 10x for the Coarse Focus map.
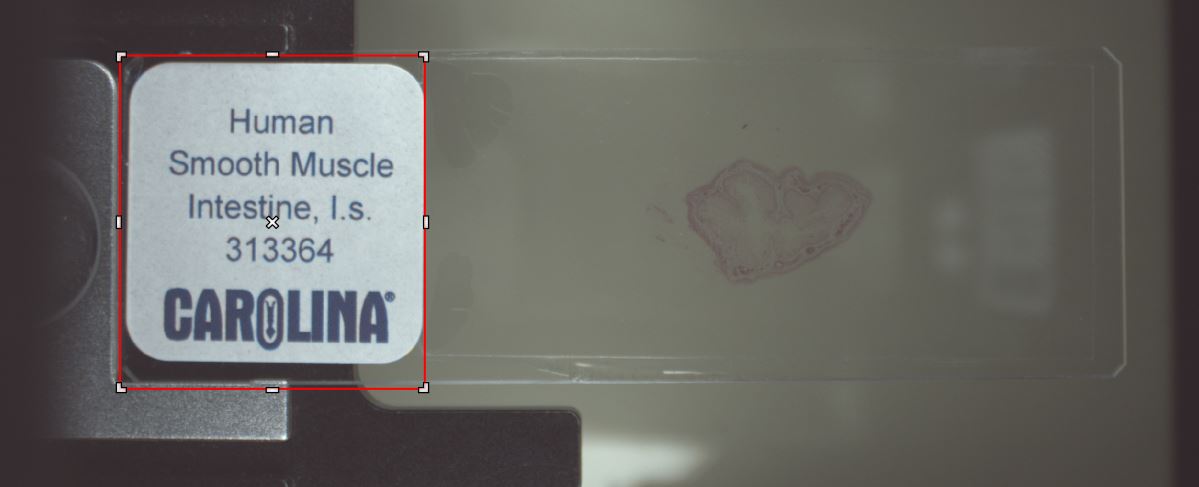
2: Label Scan Settings
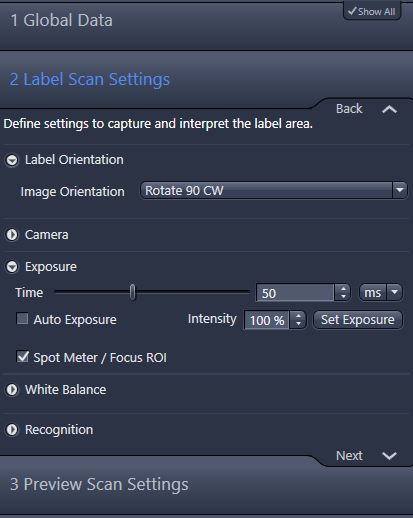
Move the size the red box to surround your label. You may also want to set the orientation so that the label is right side up in the Info window. The rest of the settings are usually fine.
Note: For this scan, the Image Orientation should not have included a rotation.
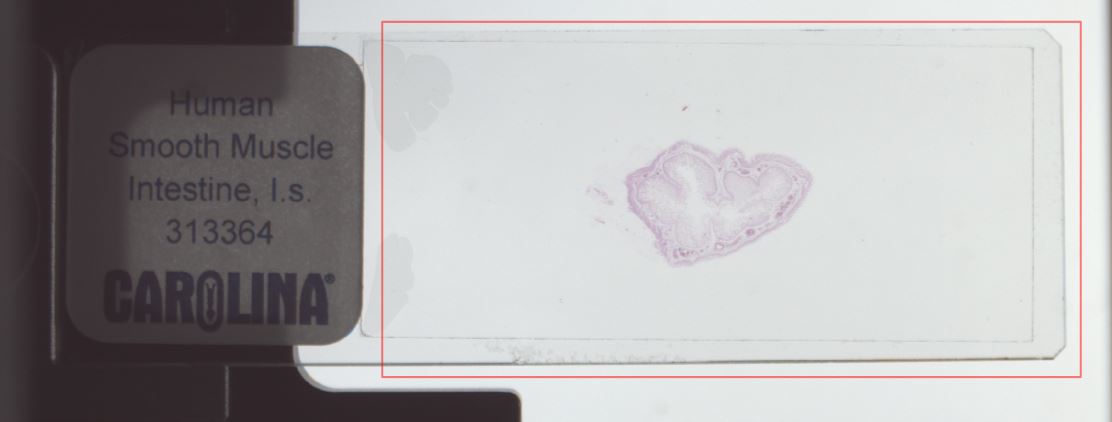
3: Preview Scan Settings (With Preview Scan)
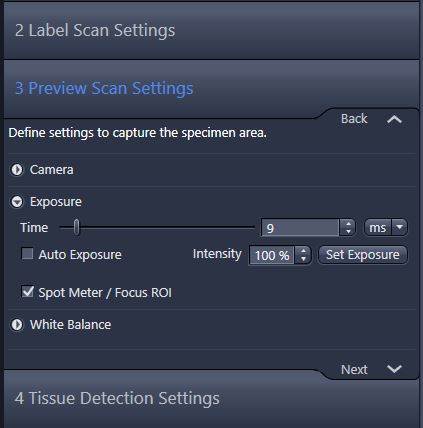
Move and size the red box to cover the rest of the slide and include a little air around the slide. Don't include the label area. The rest of the settings are usually fine although you may want to use either Auto Exposure or Set Exposure.
3B: Preview Scan Settings (With Pre-scan)
The Pre-Scan can be useful for automatic tissue detection in fluorescent samples. Because the pre-scan uses the coarse objective, it will take much longer than the preview scan. In setting up the pre-scan, you will also be setting up the Coarse focus map.
If you really want to do this, please consult the Cell Imaging staff and/or watch the video "Preview Scan with objective."
4: Tissue Detections Settings
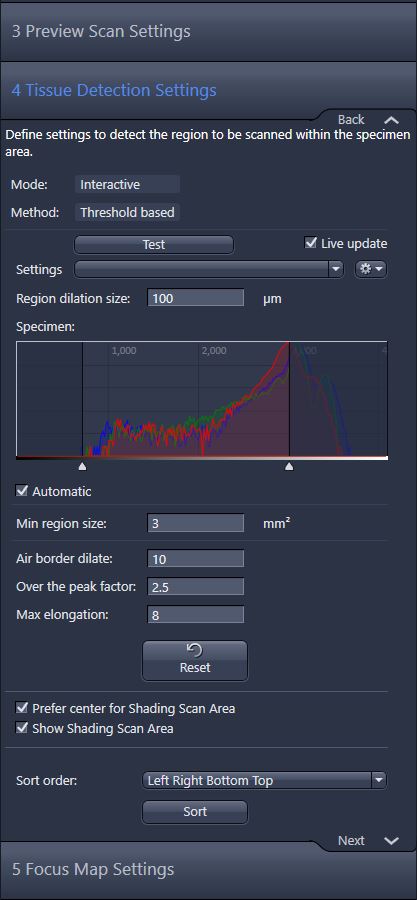
- Automatic
The common method for automatic tissue detection is Threshold Based. The threshold can be set in this window. These thresholds will be used for all scans.
- Two check boxes - Brightfield Only - 20x and 40x only
The scanner can apply a shading correction that removes or reduces intensity variations in the stitched together image. For Brightfield, the shading information is collected in areas where there is no tissue. There are two checkboxes that appear in the tissue detection section that concern the shading correction.
- Prefer center for Shading Scan Area
- Show Shading Scan Area - I prefer to check this. Other prefer not to.
If the Show Shading Scan Area is checked, you will see odd little selections in brown on the slide. These are where Zen is going to get its shading correction. I prefer to see where these are being done.
The Region dilation size is the distance from the detection to the line. This can be especially useful when using the Marker method to adjust to how closely you draw your marker loop.

5: Focus Map Settings
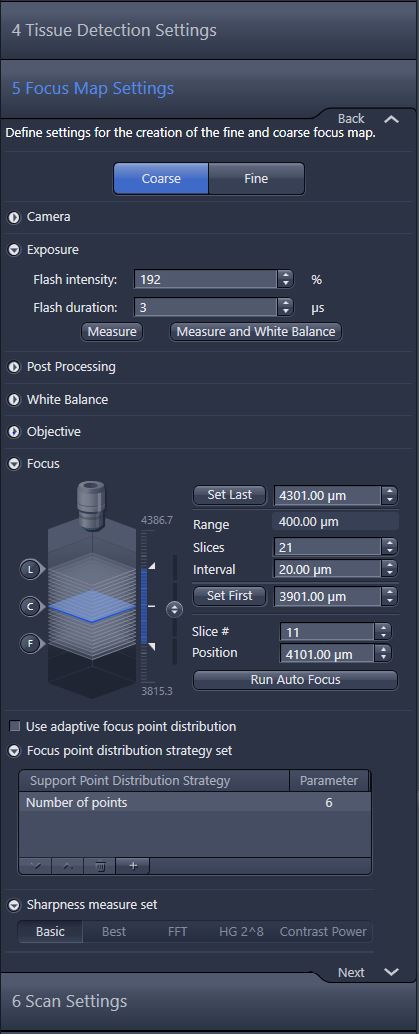
If your sample and slide are perfectly flat, one Z value is good for your entire sample. The scanner would just have to find the focus at one point and be done. Assuming that things are not perfect, the scanner needs to focus at several points and interpolate between them. This is the focus map. The scanner will construct a Coarse map using a low magnification objective. This will be Coarse in the magnification and in the number of points needed. The Fine map should use the scan objective and will need more points.
You goal with all the settings is to get a good focus over your whole sample without spending too much time. It is a balance.
- Objective:
Check that the correct objective is being used for each Coarse and Fine. The coarse objective can be 2.5 or 5X (maybe 10X for 40X scan). The fine should be the same as your scan objective.
- Focus scan settings
To find the focus, a set of images will be taken at different Z. These will be analyzed to find the best focus (may be between the Z images taken). You can set the vertical range and the step size for the focus. In Brightfield Coarse, you would like the focus to be near the center of the range.
Smart focus will start in the center and look for the best focus without using the whole range. This will be faster, but it can occasionally cause problems.
- Focus point distribution strategy:
For Coarse, the standard is a fixed number of points and is often a fairly low number (4-6). This is a number per scene. If your slides have a lot of tissue and you have merged the scenes, you may want to increase the number.
For Fine, the standard is a density method (e.g., Onion Skin or Density). These methods also have a maximum number of points (again, per scene). To change the maximum, you have to double click on the method line and edit the pop-up window that pops-up near the top of the screen. Small numbers (12-24) are fine for smaller samples. Large samples that are merged into a single scene may require a large number of Fine focus points (50-100 or more) to stay in focus over the whole sample.
- Fluorescent Channel Settings
There are more focus map settings if you are using a fluorescent channel. You will need to set up the channel to be used for focus. Optimally, this channel has distinct features (sharp edges) and is present over the sample. After selecting the channel, check the light path, especially for the objective.
Then work on setting the exposure so that the histogram is 20-30% filled. You will need to get close on exposure before you can try to autofocus. Once focused, you may need to reset the exposure.
6: Scan Settings - Brightfield

- Objective
Open this tab to make sure that it is the objective you want!
- Exposure
You can start with Measure and then adjust the flash intensity and flash duration to fill the histogram appropriately. For bright field, it should probably fill at least 2/3 of the histogram. For fluorescent, the target is typically 1/3.
- White Balance
Under the white balance section, I typically use "Pick." I will move to a blank part of the slide and click on a clear spot. The three color profiles should be co-centered.
- Post Processing


In the Post Processing, for brightfield, the shading correction should be checked.
- Online Processing


The typical setting for Online Processing is:
- Stitching: Usually Online.
- Online is typically faster than offline, but if there are stitching errors, using Offline can fix this.
- Pyramid Active: Yes (will speed up later viewing)
- JpegXR active
- Lossy Compression
- 85%
Is your profile saved? Will your profile be used?
The Zen software does not give great feedback on this. It is easy to edit a profile, start a scan, and find out that the profile didn't get saved or perhaps even used.
- Saving the modifications you have made:
Right after you have finished with the Wizard, go to the gear on the slide and select Save Adapted Profile. The default name starts with Adapted.... I suggest getting rid of all of that and saving it with a normal name (starting with your name or initials). You can even save it with the same name as your previous profile, overwriting the old one.

- Making sure the profile will be used:

That adapted profile will be used for the one slide that you set it up on. I know of two ways to get it used for the other slides.
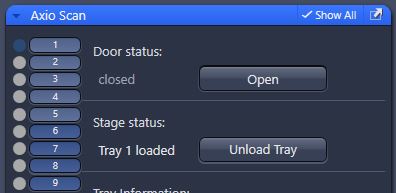
- Do a slide reset by unloading the tray (button below Open Door in the software). Open the Door. Swing the trays out, put them back and close the door. Now select the default profile you want to use.
- When you save the profile, give it a new name. Now go slide by slide and make sure they have the new profile. I have tried setting the default to the new profile. It doesn't always reset the slide's profiles.
No comments to display
No comments to display