Using the Work Authorization System
Work Auth System Overview
Prerequisite to gaining access to the cores resource system or being able to request services from any cores managed facility you will be required to fill out a "Work Authorization" form. This form is a digital authorization and data collection system that collects the necessary information for the Cores to create charges against the account information provided in the form.
- On Campus Forms - Used to add University of Utah internal accounts to our charge system. Submitters will be required to provide contact information for various individuals in addition to a valid internal University of Utah PeopleSoft chartfield.
- Off Campus / Commercial Forms - Used to create charge account records for all other users. Users will be required to provide contact information for the accounts in questions. No other information is collected.
In both cases users are required to provide the following information:
- Submitter Information - The name and contact email of the person submitting the form
- PI/Approving Contact - The name and contact information for the person who is responsible for reviewing and approving this work authorization request inside the submitters organization. This may be the same person as the submitter.
- Accounting Contact - The name, contact information, and mailing address of the accounting group/individual inside the submitters organization to which statements and/or invoices should be directed. This is also the individual who will be contacted regarding late payment, insufficient funds, or other issues related to billing.
- (On Campus/Internal Accounts Only) Account
InformationInformation - This section will appear only on the "On Campus" for and will collect the Peoplesoft Chartfield, Account Title, and other funding related information for internal university accounts. CommentsComments - This free text box is present to allow the user to request or provide other special information as needed.- Authorized Individuals - This section collects a list of authorized individuals who may create charges on the account. All fields are required. The PI/Approving contact may be copied to this section using the "Copy Approver/PI" button. Users listed here will have an account created in our systems so they may create charges and login to our systems. For already existing accounts users may also be marked for removal instead of addition using the provided dropdown.
It is very important that the PI/Approving Contact Contact email be correctly entered into the form. If the wrong email is entered the approval email will not be received and the Core Admin office does not receive notification that a new Work Authorization needs to be processed until after the PI/Approving Contact approves the email. If the approving contact has not received this email please have them check their Spam folders prior to contactcontacting the cores admin office for further assistance.
Submission Process
- Users fill out the appropriate work authorization form
- The PI/Approving Contact should receive an email containing a link to the submitted form
- The PI/Approving Contact should review the submitted for and either approve or deny the work authorization request
- If approved the work authorization will proceed to the next step.
- If denied the submitter should receive an email notification that the request has been denied. The submitter should the contact the approved/pi as to the reasoning behind the denial. Denied work authorizations do not generate notifications to the Cores Admin Office.
- If approved the work authorization will proceed to the next step.
- After Approval the cores administration office will receive a notification email that a new work authorization has been approve and is pending processing.
- The cores admin office reviews the submission and:
- Creates / Updates the listed account
- Adds/Removes user permissions on the selected account
- Marks the work authorization as completed.
Templates
For accounts that routinely have changes made to them (ex. Student Lab Tech associated accounts) the system provides the ability to store fully or partially completed forms as "Templates" for later use. These templates are stored on the submitter's browser and no on the server as a quick way to load preset information into the form. All completed fields will be stored on the template.
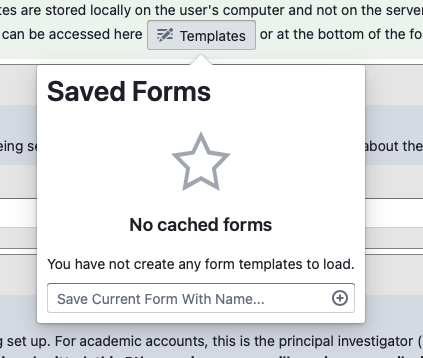
The templates interface can be accessed from the "Templates button in the green section at the top of the form or from the identical button down next to the "Clear Form" button at the bottom of the form.
Creating a Template
- With a partial or completely filled out form click on the template button.
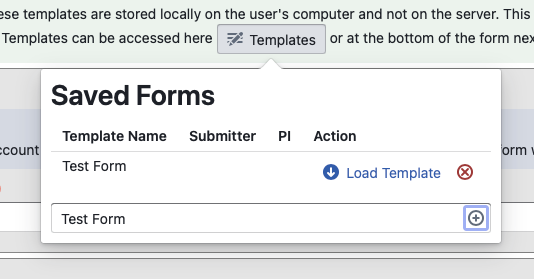
- Enter The name of the template you would like to save the data as.
- Click the circle with a plus sign inside it to save the template data
- On a successful save the named template will appear on the list of saved forms
Loading a Template
- Click on the "Templates" button
- Locate the template you wish to load
- Click the "Load Template" action
Loading a template onto a partially filled submission will overwrite any information in the form. Templates are best loaded into empty forms
Templates are stored in browser local storage. This means that if a user clears their browser cache (for what ever reason) all the templates will be wiped. Otherwise templates are stored across sessions and will be accessible on the computer that created them.


