Basics
Normal operation of the StedyCon microscope through a simple confocal scan. Separate pages will cover other types of scans, e.g., Z-Stacks, Tiled scans, STED.
These documents are to reinforce, not replace, hands on training on the microscope. All users MUST recieve training from Cell Imaging Staff prior to use of the instrument.
Stop: This is a first draft in progress. The information is not/may not be accurate.
Blue marks places where I might add photos.
Power On


- Laser Box: Turn the Laser Key to ON. The top two lights Power (Red) and Standby/Ready (Orange) are on, but do not change. The bottom two lights, Emission and Scanning are off.
- Piezoconcept: Turn on switch on front left. A green LED on the front will turn on.
- Tango Desktop: Turn on switch in back top left. A green LED on the front will turn on.
- Nikon Brightfield Lamp Power Supply: Turn on switch on front right. A green LED on the front will turn on.
- Fluorescent Lamp Power Supply: Turn on the power switch, lower left. The green Power LED will turn on.
- Fluorescent Lamp Power Supply: Press and release the Ignition Button above the power switch. The orange Lamp Ready LED will turn on.
- Microscope: Turn on the microscope with the switch on the lower right side near the back. The microscope will make noise and the front display should be on.
- Computer and software:
- If the computer is off, press the button on the front of the box.
- If the monitor is off, there is a small power button on right bottom.
- Double click the StedyCon icon on the left side of the screen. This should bring up the Welcome Screen
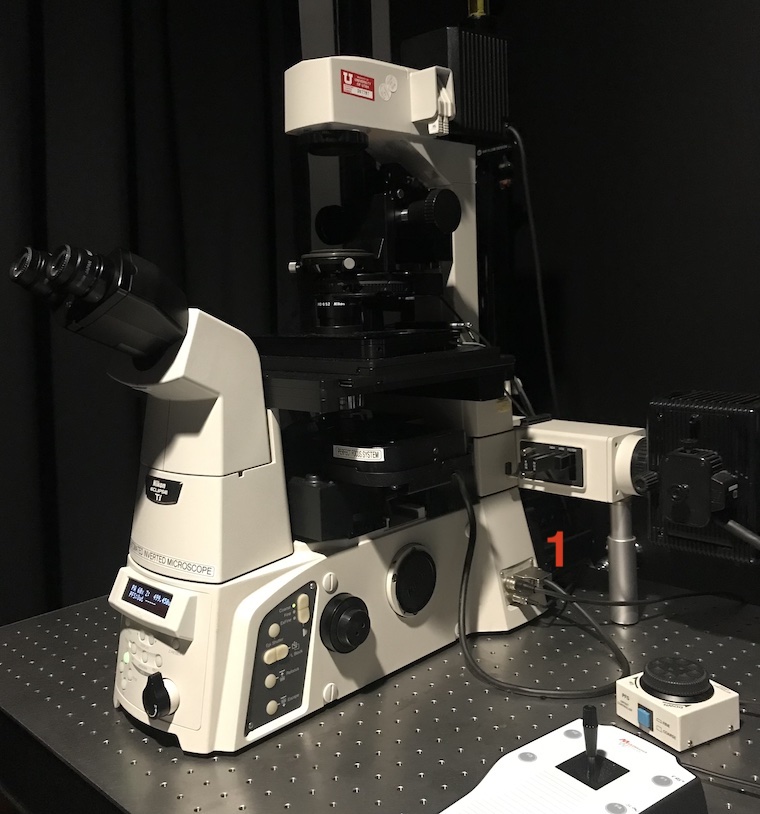
The Microscope
Your first task will be to get your sample in focus and in the correct position. This is done with the microscope and through the controls on the microscope itself.
- Apply a drop of oil to the lens if needed (60X, 100X). The lenses are parfocal, so you can start at lower magnifications first, find focus and location, and work up to the 60X, 100X.
- Place your slide with the coverslip down. Tilt the transmitted light arm back using the white housing at the top.
- Use the X-Y controller to get close to position (below).
- Set up the appropriate light path (below).
- Use the microscope to adjust focus and position (below).
XY Stage Control
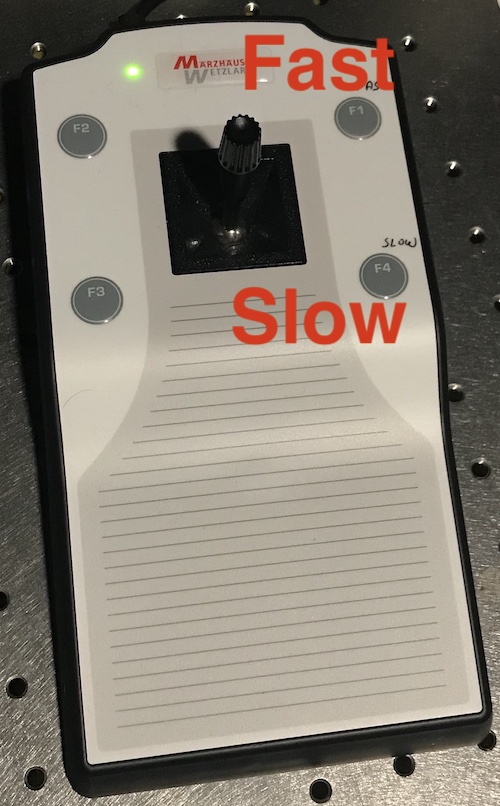
The XY stage controller is the joystick on the air table. Press the top right button to set the mode to fast / coarse motion. Press the bottom right button to set the mode to slow / fine motion.
Bright-field Light Path and Controls

? Light path set to Eye and Epi shutter set to ---
? Epi Control switch
? Bright-field controls
- Verify that the lamp is on by putting your hand in the air path between the lamp and the condenser. If it is not on, it may be switched off on the left panel or the intensity set to off.
- Verify that the condenser turret is not set to block the beam.
- Bring the Transmitted Light arm forward.
- Set the light path (on front panel) to Eye
- Use the EPI Shutter button on the right panel to set to --- (Second line will read PSF Out ---). Otherwise you will get a combination of bright and fluorescent.
- Use the light controls on the left panel to set the intensity of the light. On/Off is for the bright-field light. The knob is for intensity.
Fluorescent Light Path and Controls

? Fluorescent filters
? Beam block
? Eyes and channel
- Block the bright-field light with the condenser turret.
- Just to the left of the lamp, there are a number of filters. These do get moved to the wrong spots. Left to right, they are:
- Iris: Should be pulled out.
- A.S. Two knobs (leave alone).
- ND4: Neutral Density Filter: should be pulled out for maximum intensity
- ND8: Neutral Density Filter: should be pulled out for maximum intensity
- Filter: Should be pushed in. If out, it will block the path. Can be used as a beam block.
- Lever on the right side of the filter turret must be back. This is a beam block.
- EPI Shutter: set to one of the epifluorescent channels:
- DAPI
- FITC
- TxRed
- D-F-T
- Light path (on front panel) set to Eye
Focus

- The Z control is the focus knob. Top towards you is up.
- There are coarse, medium and fine settings.
Data Acquisition
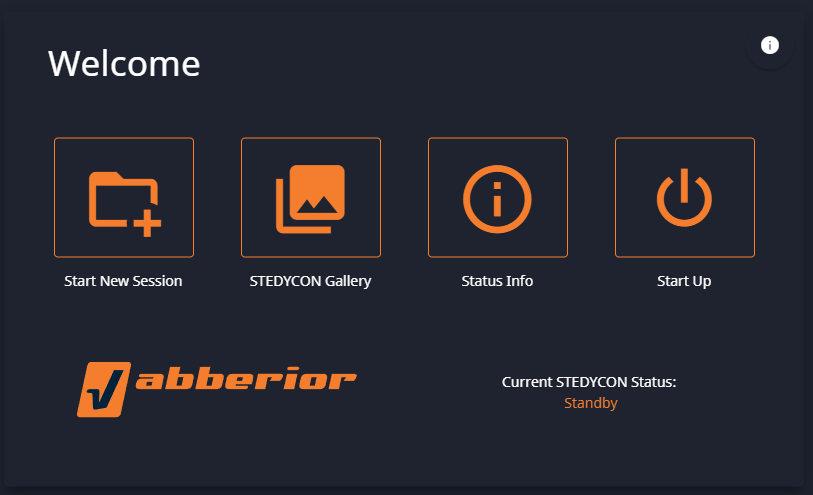
On the StedyCon Welcome screen, press Start Up. The process will take a few minutes. Wait for the status to change from Starting Up... to Ready for Imaging.
Status and Interlocks
Click on the Status Info button and a Status window will pop up in a new tab.
Double click on the Interlock line in the STEDYCON State section. This will pop up a new tab with the Interlocks status.
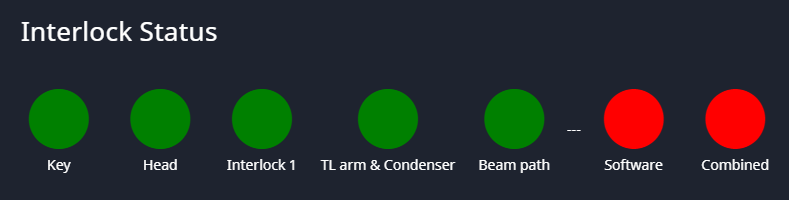
There are 7 interlocks. The first 5 must be Green before starting a scan.
- Key: Is the key on the laser box on?
- Head: ?
- Interlock 1: ?
- TL arm & Condenser: This is two interlocks:
- TL arm: is the transmitted light arm (tower) forward?
- Condenser: is the dial set so that the brightfield path is blocked
- Beam path: On the front of the microscope, switch the path to L100
- Software: will still be red.
- Combined: will still be red.
The fluorescence source is not part of the interlocks. You still need to block its path to get a good image.
- Use the lever under the filter wheel to block the fluorescence source.
- Use the EPI Shutter button on the Eclipse right panel to set the fluorescence filter to ----.
Start New Session
Click on Start New Session. This will bring up the main window and the Define New Session dialog.
New Session Dialog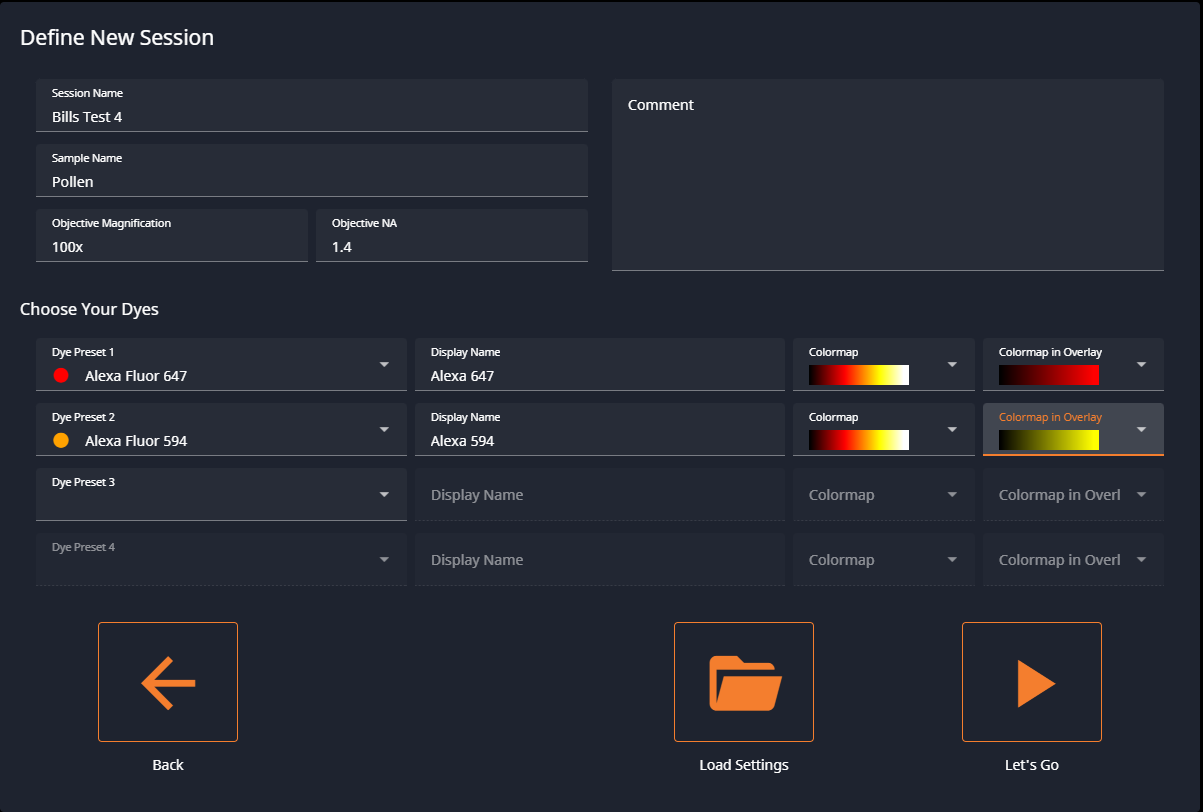
- Session Name: The session will create a folder that includes this name. All images will be stored in this folder.
- Sample Name:
- Objective Magnification: This will get used to set the pixel size.
- Objective NA: The numerical aperture will be used in the calculation of the Airy unit. (Table Below)
- Choose Your Dyes:
- Dye Preset: pick from drop down
- Display Name
- Colormap: Color map used for single channel display. Pick from drop down
- Colormap in Overlay: Color map used for this channel in overlay display. Pick from drop down
- Load Settings: Settings can be used from previous sessions (below).
- Let's Go: When everything is set, press "Let's Go" to get to the scan window.
| Magnification | Immersion | Numerical Aperature |
| 4X | Air | 0.20 |
| 10X | Air | 0.45 |
| 20X | Air | 0.75 |
| 60X | Oil | 1.40 |
| 100X | Oil | 1.45 |
Main Window
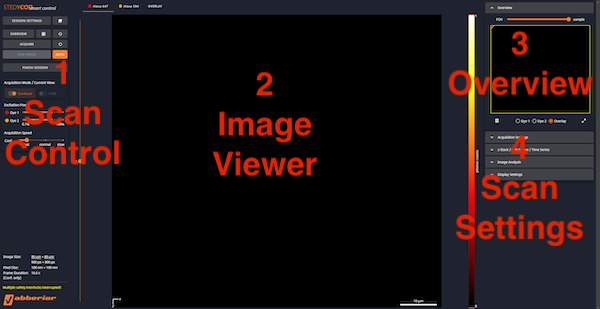
1- Scan Control

- Session Settings: Goes back to the Session Settings dialog.
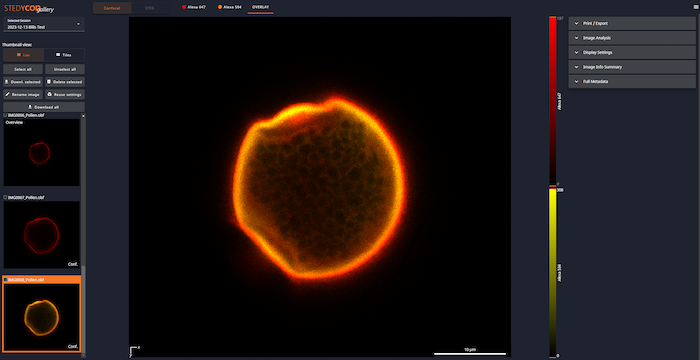
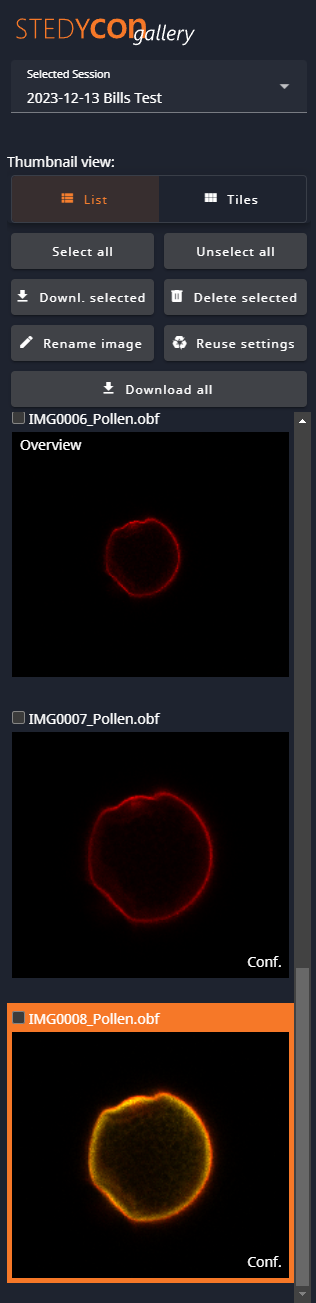
- Gallery: Opens a new tab with a gallery of images from this session.
- Overview: Do a quick scan. The loop will do continuous quick scans.
- Tile Overview: Do a quick scan tiled image.
- Acquire: Do a normal scan. The loop will do continuous normal scans.
- Save Image: Save the current image. If Auto is activated, this is dimmed.
- Auto: Automatically save new images to the gallery.
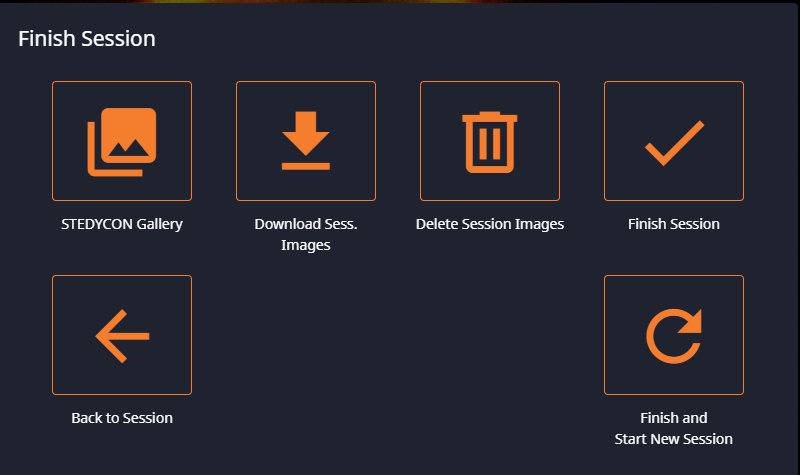
- Finish Session: finish this session, with the option to begin a new session or quit.
- Acquisition Mode: can set to Confocal and/or STED
- Confocal: Excitation power and speed. Set so that the photon counts are high enough (>70?) but do not saturate.
- STED: Excitation power, Resolution, Speed.
2- Image Viewer
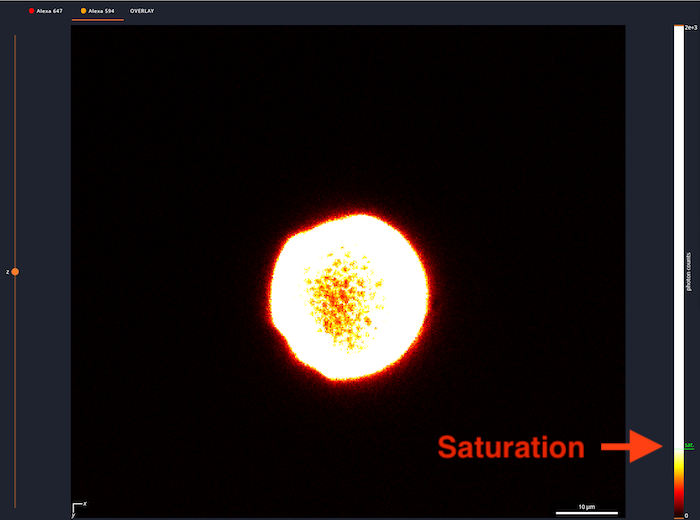
- Z: This controls the Z position of the scan. If the mouse is over the Z line, the mouse wheel can be used to move up and down. If you hover over the Dot, the current Z-position will pop up.
- Channel / Overview: At the top is a list of the channels. The channel being displayed is underlined. As you are setting up laser power, make sure the right channel is selected.
- LUT: At the right is the LUT for the channel or channels. The orange triangles can be adjusted to modify the display. In this image, the green text near the bottom shows the saturation of the detector. The excitation power needs to be reduced to get rid of this.
3- Overview

The Overview window shows what is known about your sample. The yellow rectangle is the area that will be scanned, i.e., you can zoom in on a smaller area.
4- Scan Settings
The right side has panels for various scan settings, including Z-stacks, ROI scans and time series. The Acquisition Settings has the basic settings for your scan, including pixel size and the pinhole size.

Save Your Data
If you choose to Finish Session, you will get the options to save (Download) all of your data, discard all of your data, or go to the Gallery to choose what to save and what to discard. At any time, you can go to the Gallery to view the collected data and save or discard individual images.
On the left side of the Gallery window is the Thumbnail view and the save/discard controls.
Copy your data to your own drive
Your data ends up in two places:
- The C drive downloads folder as a .zip file named: yyyy-mm-dd session name.zip
- The S drive as a folder: yyyy-mm-dd session name
The folder contains several files for each image in the Session. By default, the images are named IMGnnnn_sample name. There will be multiple files for each image:
- IMGnnnn_sample name_Thumbnail.png: the thumbnail you see in the gallery.
- IMGnnnn_sample name.obf: This is the Abberior file format. It can be opened by the BioFormats extension in Fiji / ImageJ.
- IMGnnnn_sample name.txt: A text file of the scan parameters.
- IMGnnnn_sample name.zip: A zip file of ome.tif files. These can be read by most image analysis programs (e.g., Nikon Elements or Imaris).
To copy your data, copy the folder from the S drive to your own hard drive.
What happens to the C drive folder?
What is our data clean up policy for this microscope?
Shut Down the Scanner
Finish the Session
The first step is to finish the session. At that point, you can save or delete your session images and then either finish the session or start a new one.
Shut Down
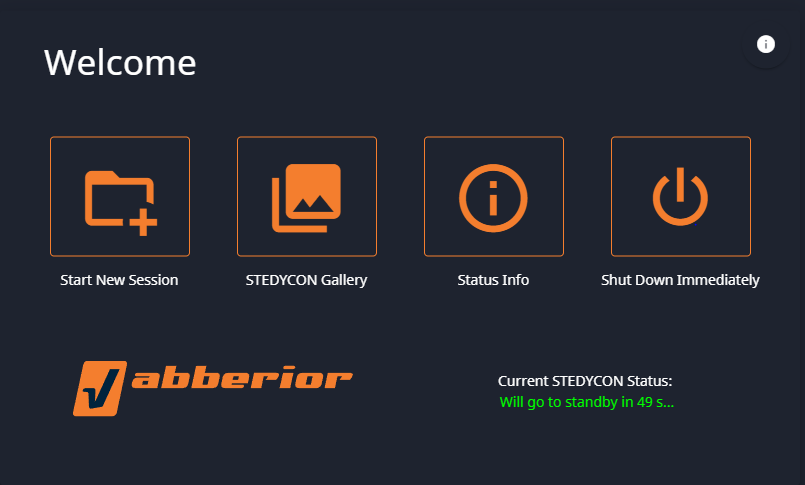
Click on Shut Down Immediately and wait for the status to be in standby.
Once in standby, you can close the StedyCon windows.
Clean up
Take your sample off the microscope.
If you used oil on the objective, please use lens paper to remove the oil. The process should be taught during the hands on training.
Power Off


- Microscope: Turn off the microscope with the switch on the lower right side near the back. The display will be off.
- Fluorescent Lamp Power Supply: Turn off the switch on the front right. Green and Orange LEDs will be off.
- Nikon Brightfield Lamp Power Supply: Turn off the switch on the front right. Green LED will be off.
- Tango Desktop: Turn off switch on back top left. Green LED will be off.
- Piezoconcept: Turn off switch of from left. Green LED will be off.
- Laser Box: Turn the Laser Key to OFF. The top two lights Power (Red) and Standby/Ready (Orange) remain on.
Cover the Microscope
Put the dustcover on the microscope.
Normally, the computer is left on or put to sleep.
No comments to display
No comments to display