Managers Guide
The guide for manager actions in the resource.cores.utah.edu system
- Order Management
- Approving an event order
- Approving a single order
- Batch approving orders
- Adding a line item order batch
- Altering an order
- Refund / Discount Process
- Excluding an order
- Managing User Permissions
- Generating Reports
- Accessing Invoices
- Sending Messages / Broadcasts
- Auditing Charges
- Tags / Advanced Functionality Configuration
- Managing Services
- Service Configuration Overview
- Scheduled Service Configuration
- Line Item Service Configuration
- Order Form Service Configuration
- Black Box Sample Processing Service Config
- Data Collection Form Config
- Webhook / Interlock Configuration
- Walkup Service Configuration
- Service Status Management
- Data Collection Form Sub-system
- Creating a Data Collection Form
- Signature Blocks
- Custom Form Configuration Overview
- Charge Calculation Fields
- Managing News
- Quote System
Order Management
Approving an event order
Group managers can alter the billing status of individual events from the calendar event details using the "Billing Status" dropdown and then clicking the "Update Event" button.

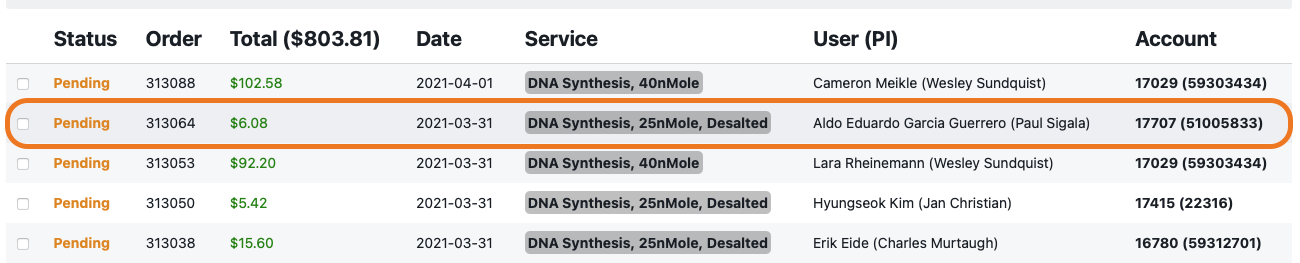
Approving a single order
- Click on the "Manage" icon in the top bar

- Click on "Manage Approvals"

- Click on the button for the group that has the order to be approved

- Click on the order row you wish to approve

- Click on the "Approve" button


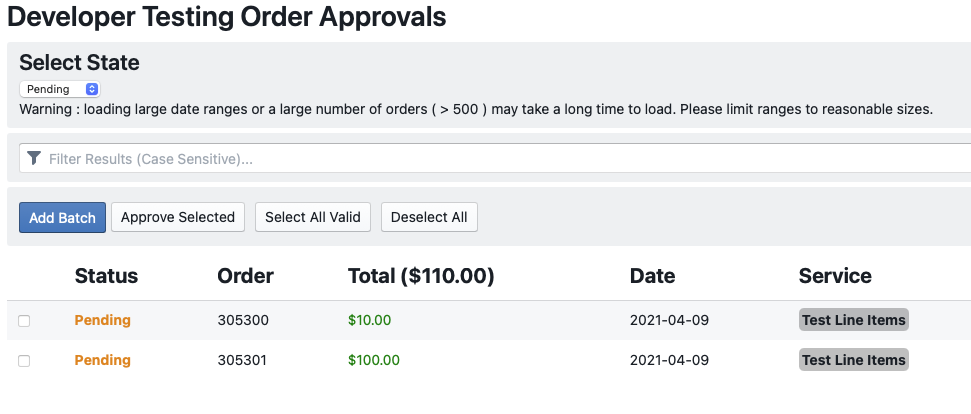
Batch approving orders
- Click on the "Manage" icon in the top bar
- Click on "Manage Approvals"
- Click on the button for the group that has the order to be approved
- Use the check boxes next to the order rows to select all orders that you wish to approve. You can also use the "Select All Valid" button to select all error free orders that do not occur in the future for approval.

- Click the "Approve Selected Button"

- Click the "Confirm" button


Adding a line item order batch
For groups that need to add large numbers of line item orders there is a Batch Upload form available for managers. This can be accessed from the "Manage Approvals" interface.

This will take you to the batch order upload interface.
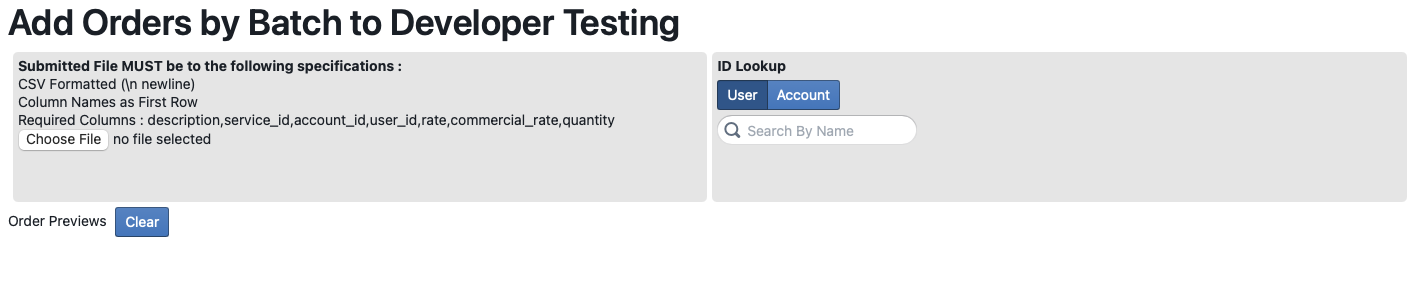
This interface allows managers to upload and validate a list of charges to be grouped by charge account into orders. The order CSV file must include the following fields:
- Charge description
- Service ID (system id) of the service to create the charge for
- Account ID (system id, not short account) of the account to be charged
- User ID (system id) of the user who is ordering the charge. Note that this ID MUST be an account that is both valid and that the provided user is authorized to charge on.
- The rate per item to charge
- The commercial rate per item to charge
- The quantity to be charged for
Note that line items will be grouped into orders based on the account_id and user_id fields. If you need line items for the same user and account to appear in separate orders you will need to upload them in separate files
After upload the system will provide feedback on the uploaded file, including any errors
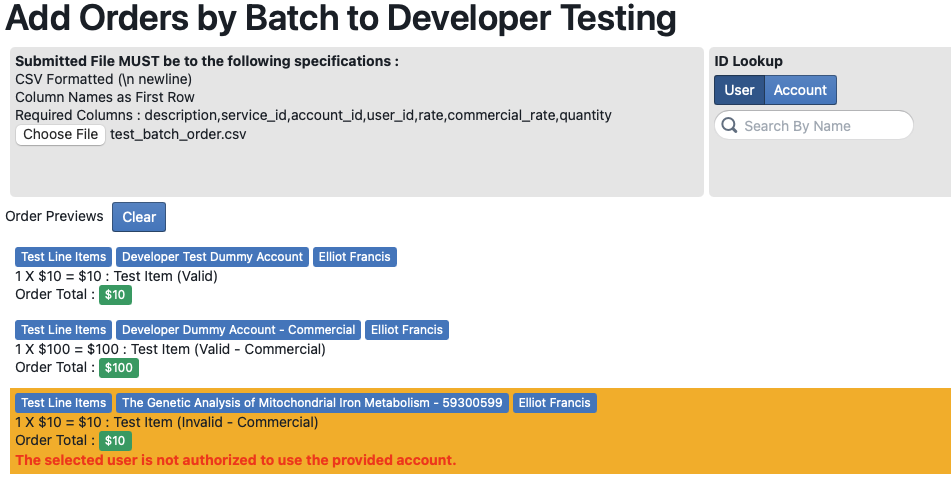
Once any issues have been resolved a "Submit" button will appear at the bottom of the list of orders
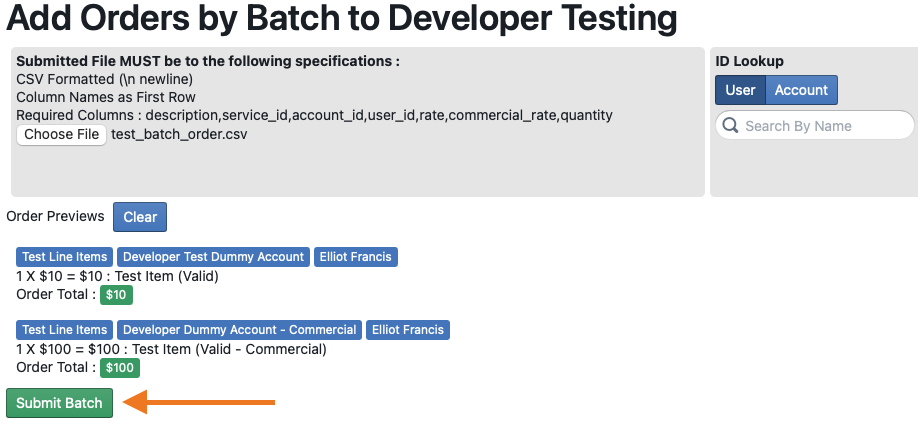
After a successful submit you will be returned to the "Approvals" screen and the newly created orders will appear on the orders list.
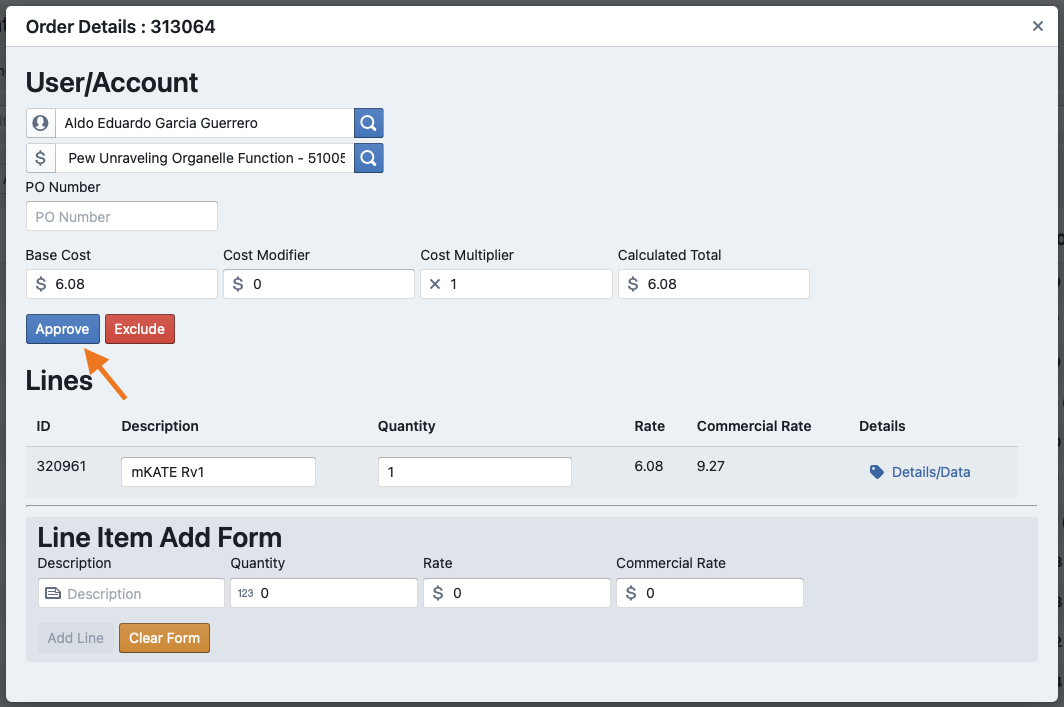
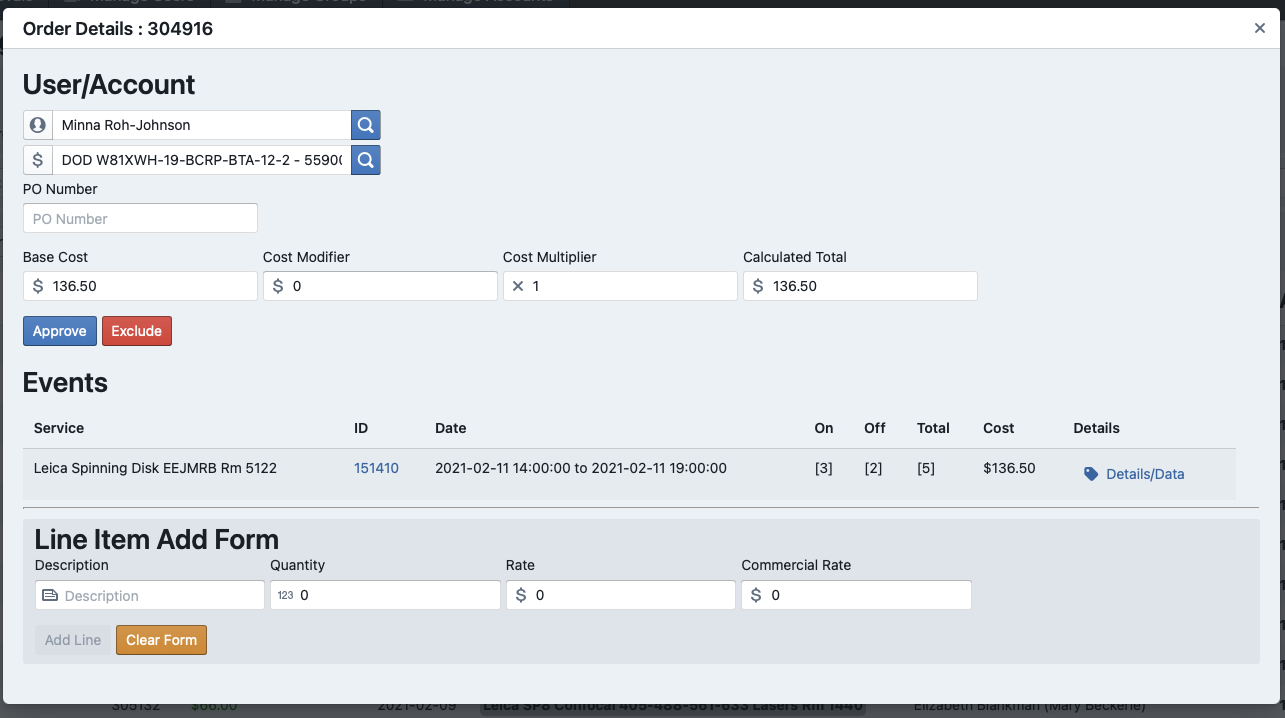
Altering an order
- Click on the "Manage" icon in the top bar
- Click on "Manage Approvals"
- Click on the button for the group that has the order to be approved
- Click on the order row you wish to edit
- Edit any details of the order you wish to change and then click the "Save" button.

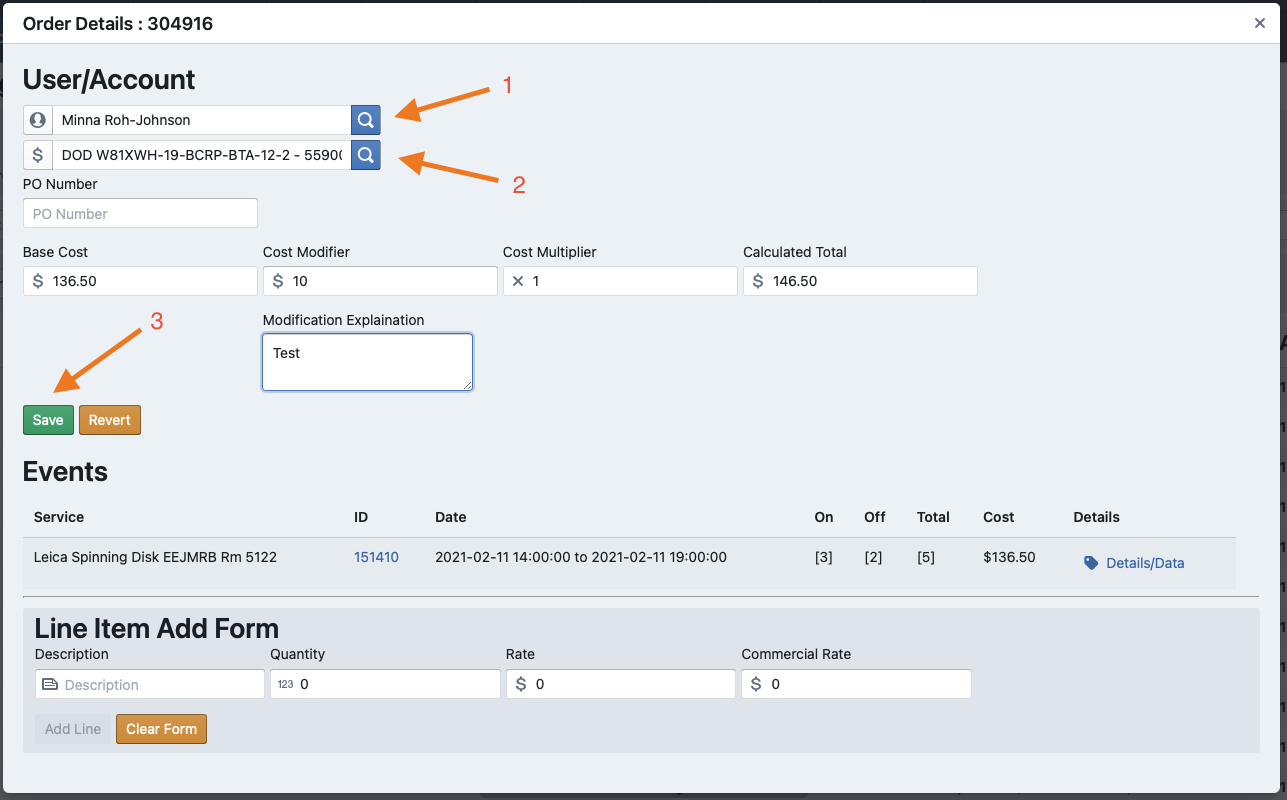
Note: Line item's on existing orders can only have their quantity altered. If a line MUST have it's rate altered please zero out the desired line and add a new Line Item using the "Line Item Add Form"
Adding a Line Item
Line items can be added to any order by using the "Line Item Add Form". This form functions the same as a standard line item form absent the custom data fields. Please note that added line items CANNOT be remove and instead must be zeroed out after adding.
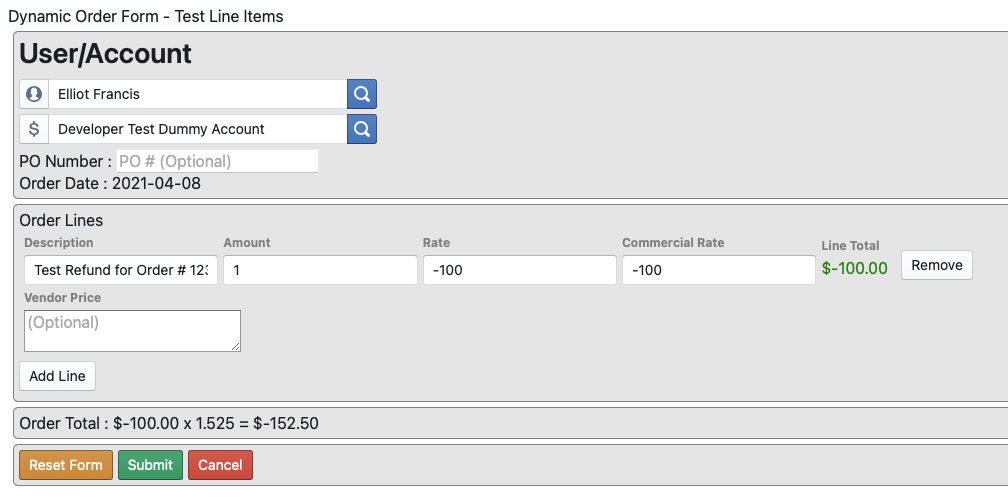
Refund / Discount Process
For historical reasons orders cannot be voided or deleted from the system. Occasionally mistakes are made and a refund must be issued. To do so a manager must submit a new order with a negative value to be processed with the next billing cycle.
Process
- Go to a "Dynamic Order Form" (Often labeled "Line Item") service as a manager
- Select the user the refund will be applied to
- Select the account the refund will be applied to
- Enter a line item that results in a negative number
- Submit the form
- Approve the created order for inclusion in the next billing cycle.
Excluding an order
- Click on the "Manage" icon in the top bar
- Click on "Manage Approvals"
- Click on the button for the group that has the order to be approved
- Click on the order row you wish to approve
- Click on the "Exclude" button

Managing User Permissions
Add User Permissions
When logged in as a manager for a group it is possible to grant other users various levels of access to the groups that you control.
Permissions
- Disabled - Denies user access to your group.
- User - The default state of any users when a permission is created or if no permission exists
- After Hours User - Allows the specified user to use scheduled services also marked as allowing after hours in after hours slots
- Manager - Allows the specified user to manage the group
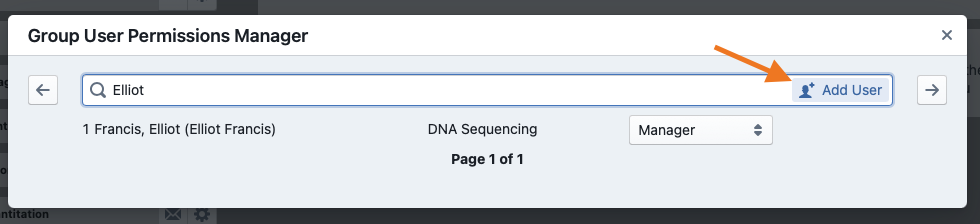
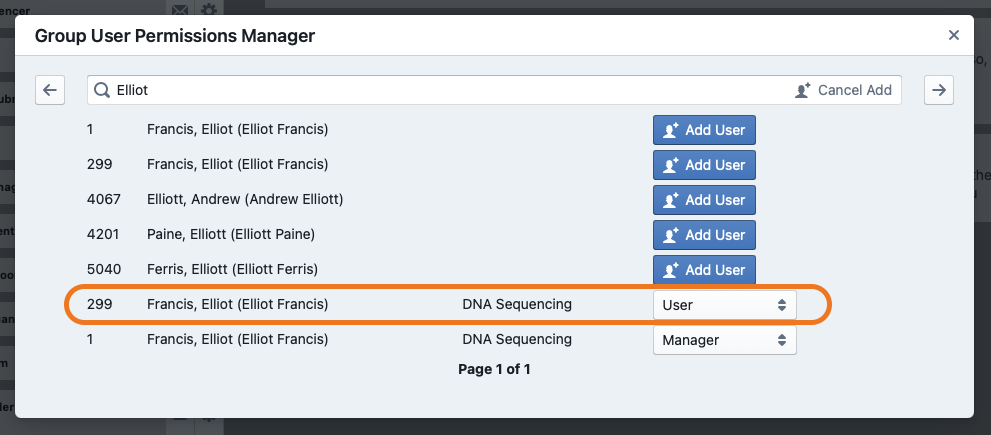
Adding a Permission
- Select the group for which you have manager permissions:

- Click on the "Manage User Permissions" Button

- Search for the user by name to ensure that they do not already have a permission entry. If the user you are looking for does not show up in the search list click the "Add User" button and search for the name of the person you wish to add.

- To add a new permission click on the "Add User" button on the row next to the user name.

- The user record will be added to the list of users with a default permission of "User". You can now set that user to any available permission via the dropdown next to their name.

- Repeat steps 3 to 5 for as many users as you want. When finished click the "X" in the top right corner of the dialog to close the dialog and return to the main page.


Change User Permission
When logged in as a manager for a group it is possible to grant other users various levels of access to the groups that you control.
Permissions
- Disabled - Denies user access to your group.
- User - The default state of any users when a permission is created or if no permission exists
- After Hours User - Allows the specified user to use scheduled services also marked as allowing after hours in after hours slots
- Manager - Allows the specified user to manage the group
Adding a Permission
- Select the group for which you have manager permissions:
- Click on the "Manage User Permissions" Button
- Search for the name of the person you wish to alter a permission for (partial search is fine).

- Click on the dropdown box next to the person you want to change the permission for and select the desired permission.

- Repeat steps 3 to 4 for as many users as you want. When finished click the "X" in the top right corner of the dialog to close the dialog and return to the main page.


Generating Reports
Available Reports and Formats
Formats
- Fixed Width Text File - Displayed as page

- CSV File - Downloaded as file


Reports List
By default the resource management system provides the following reports to managers and administrators:
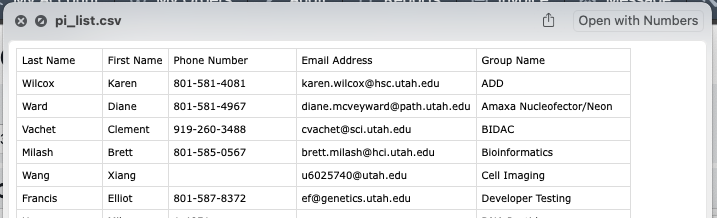
- Master User List - All users accounts in the system by first and last name in alphabetical order
- PI List - The list of all Principle Investigators responsible for each active group
- Active Account List - The list of all charge accounts currently available (active and un-expired) to be charged in the system
- Group User List - A time range bounded list of all users who have ordered from a given group
- Group PI List - A time range bounded list of all pis who have ordered from a given group and which services they ordered.
- User Service Revenue - A time range bounded list of all users who have ordered from a given group and grouped by service used, account charged, and total revenue charged.
- Group Revenue (Service) - A time range bounded summary of all usage and billing for a given group categorized by Service.
- Group Revenue (PI) - A time range bounded summary of all revenue for a given group categorized by the Principle Investigator/Owner of the account charged. Ordered by most to least charged
- Group Active Accounts - A time range bounded summary of all revenue for a given group categorized by the title of the account charged and sub-categorized by the users who created those charges
- Excluded Revenue - Excluded Revenue Report show all events that have been excluded during the given period
- Pending Revenue - Download a list of all pending events or line items.
- Group Rates/Presets Sheet - Download a list of all current rates / line presets for the selected group.
- Group Sales Tax Summary - Download a summary of all sales tax for billed items in the range given.
- Fiscal Year Summary - The sum of all charges to a facility grouped by fiscal year.
- All Events - Download all Events that occurred in the given time frame. Used if custom analysis is to be performed.
- All Line Items - Download all line items that occurred in the given time frame. Used if custom analysis is to be performed.
- Event Attached Items Report - Download all line items that are attached to events (e.g., service charges, etc.),. May be modified to include selected non-event line item results as well. Used for generating tracking reports (Staff Time, etc.)
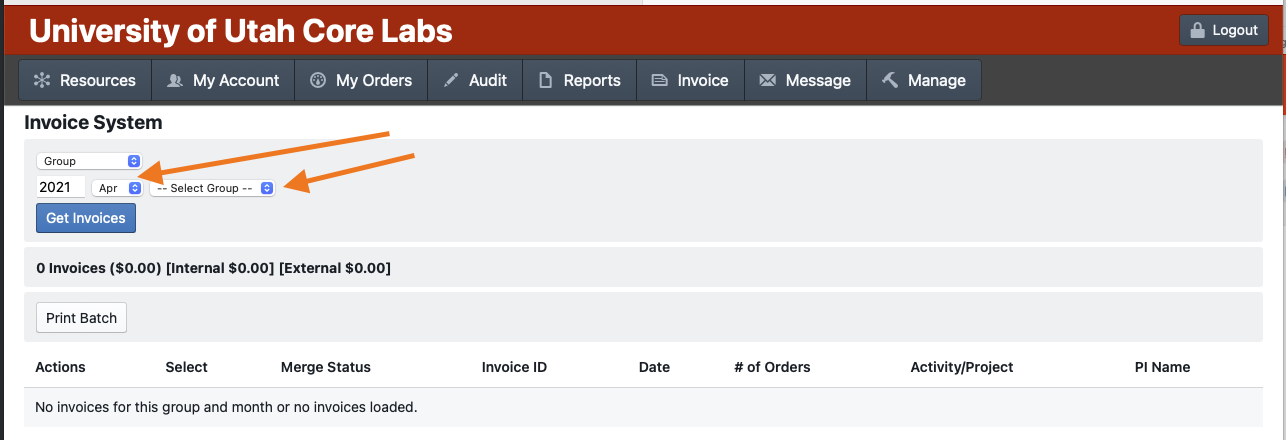
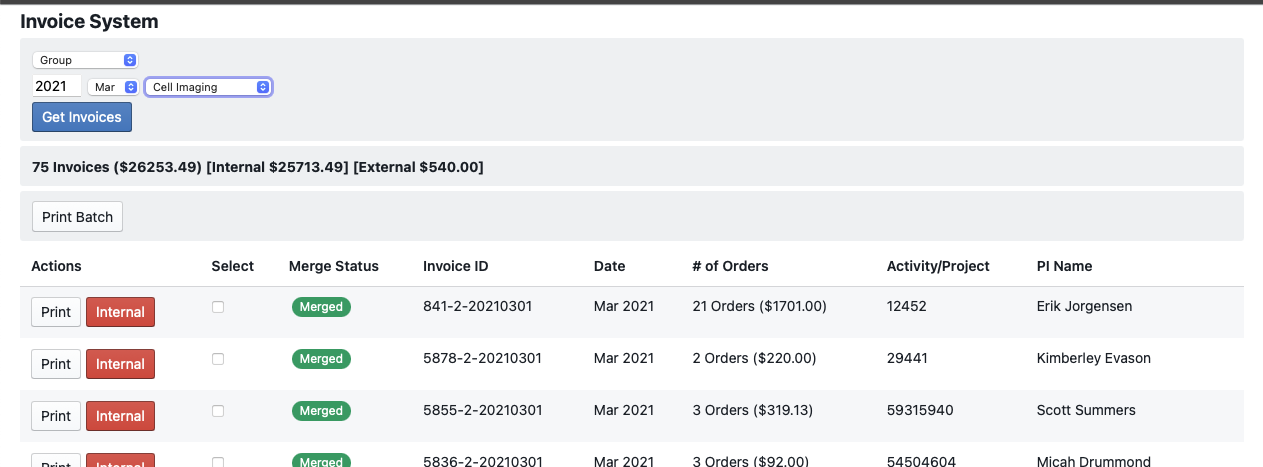
Accessing Invoices
List Invoices by Billing Month
- Click on the "Invoices" button on the top bar

- Select the Month, Year, and group you want to load invoices for

- Click the "Get Invoices" button
- Click the "Print" button on the invoice you want to view OR use the checkbox to select all the invoices you want to print as a batch and click the "Print Batch" button.


Search for an Invoice
- Click on the "Invoices" button on the top bar
- Select the type of search you want to use from the dropdown and enter your search criteria.

- Click the "Get Invoices" button
- Click the "Print" button on the invoice you want to view OR use the checkbox to select all the invoices you want to print as a batch and click the "Print Batch" button.

Sending Messages / Broadcasts
Messaging Overview
The system messaging interface can be accessed by clicking on the top bar message button.

The messaging interface allows managers to target specific audiences to receive an email messages. This will usually mean targeting the users of a specific group or services. Occasionally this will include individual users. Target groups and users are added by searching for and clicking on their names in the 3 columns. This will add the recipients to the list underneath the title. For services and groups a target range is also required (defaults to 1 month from today's date).
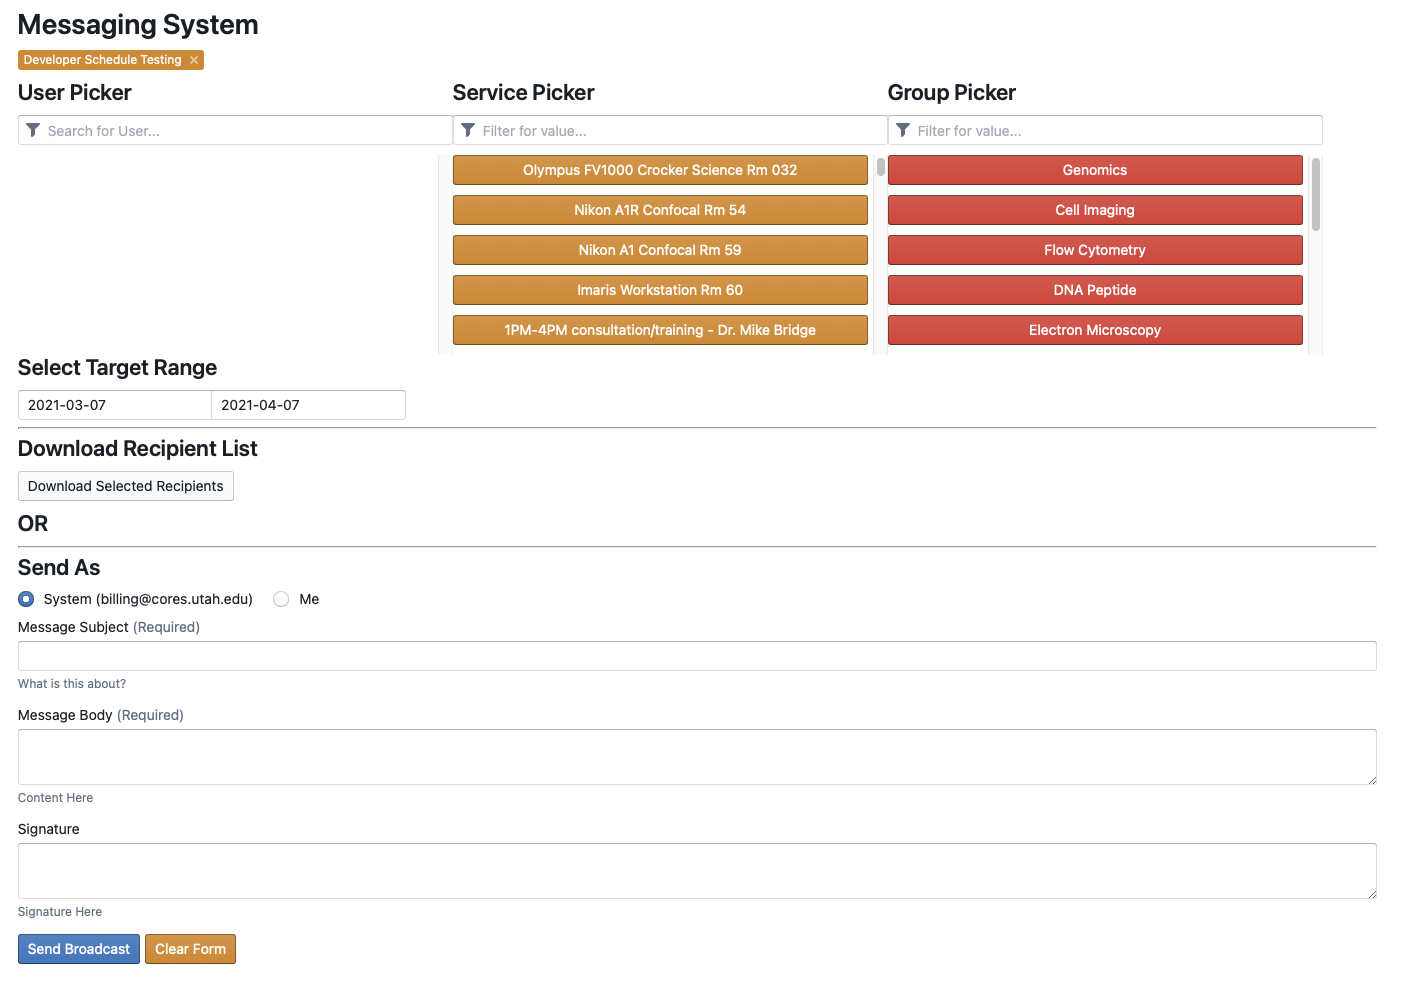
Senders can chose to send from the system itself or chose to use their provided email address as the sender. They can also chose to download the list of targeted recipients for use in creating a mailing list or sending using an email client as preferred.
Auditing Charges
Auditing Overview
Users added as auditors in the system can access the "Site Information Audit" interface to review account access and charges.

The site audit interface allows auditors to review accounts, users, and PO numbers by full and partial search

Accounts
Auditors can use the accounts search to review pending charges and users with permissions on the account through the accounts tab. Auditors can search by partial or exact criteria on a list of target values:
- System ID Number
- Title
- Short Account Number
- Activity Code
- Project Number
- Organization ID
- PI Full Name
- Total Amount billed to the account to date. This column also includes a link to the Account History report.

Pending Charges
Pending charges on an account may be listed by clicking on the short account number button

Account User List
Users with active permissions on the account will have their email address tag in green

Users
(In progress)
PO Number
Auditors may also search for a summary total of charges to a given PO number IF the order in question has been properly tagged with the PO number by the submitting/ordering user

Tags / Advanced Functionality Configuration
Overview
Some records can be configured with advanced functionality by applying tags in the record tag manager interfaces such as the "Service Tags Manager" for service configuration. Where available it is recommended to use the provided wizard rather than the "Manual Tag Wizard"

The service tag manager has a number of tag wizards for attaching functionality to the service in question:
- Required User Tag Wizard - Works in conjunction with the "Service User Tag Manager" to restrict users from scheduling on services without the appropriate tags.
- Manual Tag Wizard - All other tags.
Please note that tags are CASE SENSITIVE. This is important when setting required user tags or when using the Manual Tag Wizard.
Available Service Tags
has_interlock:<lead_grace_duration_in_minutes>:<post_completion_duration_in_minutes>- Marks a service as having a hardware interlock. Controls access to the interlock buttons on the event details. The durations control how far in advance of the reservation start or after the reservation end a user may have access to the interlock controls. Defaults to 5 minutes if the provided values cannot be parsed as integer values.set_end_on_lock- Instructs a service to set the end time for the open event to now when the "Lock" interlock command successfully executes.trim_end_on_lock- Instructs a service to set the end time for the open event to now when the "Lock" interlock command successfully executes. Will not extend events past their scheduled end date.post_lock:<url>- Instructs a service to provide a link to the provided url when the "Lock" interlock command successfully executes.usage_data_form:<form_service_id>(?:manager_exempt)- Links a service to a given data form as a required submission. Optionally exclude managers from needing to fill out the form.maintenance_report_form:<form_service_id>- Links a service to a given data form as a manager accessible maintenance reporting form.-
require_user_tag::<action>::<tag>::<value list>- Request that a user have one or all of the provided values for the specified tag and action. (Only applied to scheduled events currently, only supports create event)- Ex: require_user_tag::create::training::trained - Requires that a user have the tag `training` with the value `trained` when creating orders on the specified instrument.
-
block_email_to_proxy_users- Instructs a service to not send emails to the owning user when that user has an event created on their behalf. after_hours_users_ignore_lead_time- Allows user with after hours permissions to also schedule inside the lead time in cases where it is otherwise not allowed
Available User <-> Service Tags

allow_schedule_in_lead- Applied as a Service User Tag, this tag exempts the owning user from the minimum lead time restrictions for the service identified.user_training_status- Applied as a Service User Tag, this tag marks a user as having a specified training value to match the servicerequire_user_tag::<action>::<tag>::<value list>configuration from above.
Available User Tags
ignore_max_lead_time:<service_id>- Applied to a User, this tag exempts the owning user from the maximum lead time restrictions for the service identified.sso- Marks a specified user as using a SSO provider. Disables any local password management functionality for this user.
Available Account Tags
ignore_max_lead_time:<service_id>- Applied to an Account, this tag exempts the owning account from the maximum lead time restrictions for the service identified.
Available Rate Tags

require:group:manager- Applied to a Rate this tag will mark a rate as only accessible by group managers. It will appear as grayed out for standard users.rate_exclusion_group:<group_name>- Applied to a rate this tag will tell the scheduler to check event collisions against any service rate that also has this tag. Example: if the standard rate on both the Microscope A and Microscope B were added to the same rate exclusion group (`rate_exclusion_group:microscope_test`) then the system would block a user on Microscope B from scheduling IF an event already exists on Microscope A that uses a rate from the same group with the error message below.

When specifying group name do not use special characters or spaces. Comparisons are also case sensitive so "Test_GROUP" will not match "test_group". rate_exclusion_group:test_group - Validrate_exclusion_group:This, That - Invalid, Will result in multiple tags
Available Preset Tags
rate_link:<rate_id>- This tag links preset/fee to a specific rate. When this tag is set any linked rate that is selected will have this preset added as a fee. Selecting a different rate will remove this fee. Rates may be linked to multiple presets/service fees.


Managing Services
Service Configuration Overview
Types
The resource system supports 3 general types of services:
Blue services can only be configured/created by a system administrator.
- Scheduled - Services that have a start time and ending time for each use.
- Per Hour - Services that charge based on the duration of use
- Per Run - Services that charge the same amount per use regardless of duration
- Line Item - Services that have a quantity and price per unit
- Line Item - A blank line item form that allows the submitter to specify all aspects of the order (Rates, Quantity, Descriptions). Note: Line Item services are forced to be "Manager Only" by system convention.
- Order Form Template - A pre-filled line item form that allows the submitter to specify just the desired quantities with all other information provided as a fixed submission.
- Genome Processing - A Sanger Genome Sequencing specialized BBSP variant. (highly customized submission system. Works with an outside processing script to provide quick-turn around file delivery of 96-Well Sanger Robotics results. Generates Line Item orders.
- Black Box Sample Processing (BBSP) - A generalized sample processing / submission system that includes file storage. Generates Line Item orders.
- Mass Spectrometry Sample Processing (MSSP) - A Mass Spectrometry specialized BBSP variant that generates line item orders.
- FASTA Sample Processing (FASTA) - A DNA Sequencing specialized BBSP variant that generates line item orders.
- Data Collection/Other - Services that do not have a price but are instead for collecting data
- Custom - Links to a custom subsystem or ordering form. (Requires developer involvement)
- Link - A hyperlink to a fixed or outside page. Primarily used for linking to training or other informational documents
- Data Form Template - A configurable data collection form. Does not generate an order/charge.
- Walkup - A cousin of the scheduled service, walkup services are services that record usage in real time and create a charge event based on the start and end times.
All service types except data collection services will generate an order record with associated events (scheduled) and line items. Services can be configured to automatically exclude created orders from the billing process if the services are provided for free.
Scheduled Service Configuration
Scheduled services for the resource system represent an order for services that are intended to take place on a specific instrument at a given time. Schedules services may be configured to have as many selectable rates as desired. Configuration of a scheduled service is broken down into a number of sections identified below.
Creating a new service
A new service can be created by clicking the "Create New Service" button located above the service list search box

Newly created services will not exist until saved after initial configuration. This means that some functionality that needs an id number such as creating service rates will not be available until the user click the "Save" button to save a newly created service.
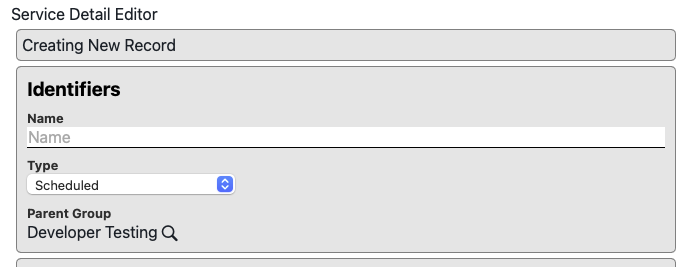
Identifiers

- Record ID - The system ID number identifying the service
- Name - The display name of the service in question.
- Type - The type of the service. Defaults to "Scheduled"
- Parent Group - The group to which this service belongs. Defaults to the currently active group but may be changed to any group that the creating user is listed as a manager for
Visuals
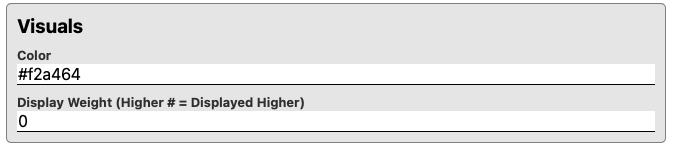
- Color - The color of the button to access the service as it appears in the group services list. This field will accept and valid CSS color in string format. Ex:

- Display Weight - How high in the list a service will be displayed. Higher values will display first. Ex: 10 will appear after 50
- Display Path - For facilities with large numbers of instruments / services it can be helpful to have some additional level of organization. The display path setting allows managers to organize services into folder style nested groupings. The convention follow standard unix pathing conventions. Ex: "/Microscopes/" will display the given service under an expandable section with all other services that have the same configuration.

Contact Information

- Location - The location the service is located at. This field is optional and will display after the service name on the list of services
- Contact Email - The list of email addresses that should be send a notification message. The contact email list can be configured to send emails to any number of addresses. Generally this will be the email of the person or persons responsible for managing the instrument. Email contacts can be configured to receive emails on the following events:
- All Events - Send a notification for event creation, deletion, and update actions
- Only Create - Send a notification on event creation
- Only Update - Send a notification on event update
- Only Delete - Send a notification on event deletion
-
Note: The contact email configuration does NOT override the general "Notification Verbosity" setting for the service. If a service is configured to suppress all notification messages then no emails will be sent regardless of the contact email configuration
General Config

- Enabled - Whether this services is actively in use
- Yes - Active
- No - Inactive
- Archived - Inactive and hidden from search list. (Used for removing services from general use and declutting un-used service records
- Notification Verbosity - When to send notification emails for actions that occur on the service
- No Messages - No notifications sent
- On Create - Only send event creation notifications
- On Delete Only - Only send event deletion notifications
- On Create/Delete - Only send notification when an event is created or deleted
- All Messages - Send notification for all event creation, update, and delete actions
- Manager Only - Controls if service is visible/available to all users of a facility or just facility managers
Tags

Tag strings used by the system for categorization and certain actions. No special tags are defined for services at this time.
Scheduler Config
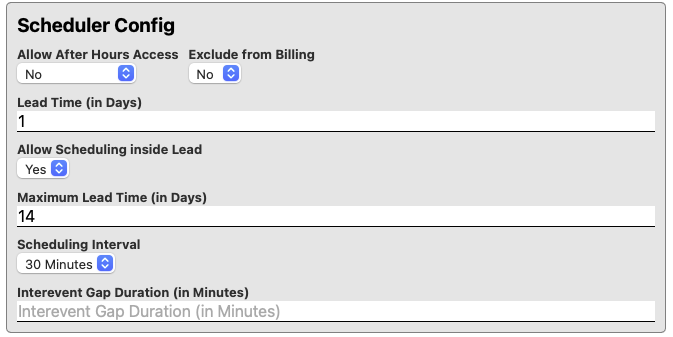
- Allow After Hours Access - Controls if the blocked times are treated as "After Hours" or "Blocked"
- No - Time blocks are not accessible to general users. Administrators and Managers may still schedule in "Blocked" times
- Yes - Allow users with explicitly granted "After Hours" permissions to schedule during off-hours
- Yes (All Users) - Allow any user to schedule time during off-hours
- Exclude from Billing - Controls if any orders created on this service are automatically excluded from billing. Useful if a service is provided for free.
- Reopen Event Details on Create - Some use cases need immediate access to the newly created event (eg. instrument interlocks). This convenience setting has the system immediately re-open the created event after it's initial creation.
- Lead Time - Determines how many days in advance a user must schedule. 0 or empty is no lead time.
- Allow Scheduling inside Lead - Controls if a user may create (but not update or delete) an event inside the lead time. Useful for services that can be scheduled quickly (filling a last minute cancellation) but need special attention on cancellation.
- Maximum Lead Time - The maximum number of days in advance a service can be scheduled by a user. Useful for preventing users from "camping" time slots for months in advance that they may not use.
- Scheduling Interval - The minimum "block" size of a scheduled event. Accepts sizes from 15 minutes to 1 week.
- Interevent Gap Duration - The minimum amount of time between service uses. Useful if a service has setup/teardown needs.
Blocked/Off-Hours Times
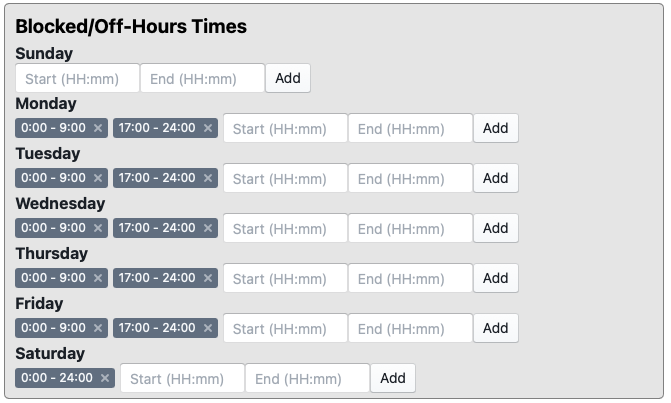
This section controls what times during the week are treated as Off or Blocked hours during which altered rates may be applied or access may be blocked entirely. Time formats are in 24 hour formats. Defaults to no limits. Common times are 00:00 - 09:00 and 17:00 - 24:00 to give a 9am to 5pm working day.
Custom Data Config
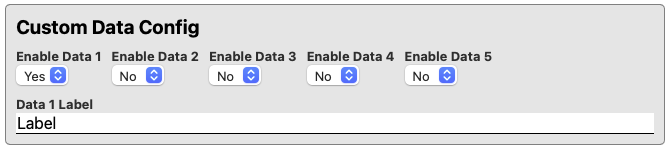

Some services may require additional information to perform. Up to 5 custom data fields may be enabled for the scheduling user to enter custom information. These custom fields will appear as text input boxes at the bottom of the event details with the provided data label/query.
Custom Data Field Label Config
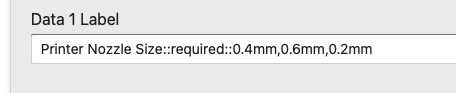
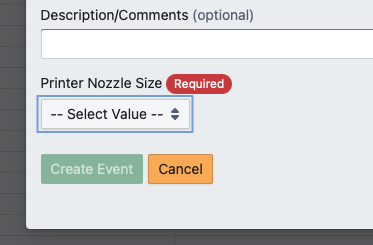
Custom data fields may also be marked as required and/or displayed as a dropdown selection list using the following configurations in the Data Label field
<data_label_text>::required::<comma_separated_list_of_options> - Required Option Dropdown
<data_label_text>::required - Required Text Field
<data_label_text>::<comma_separated_list_of_options> - Optional Option Dropdown
Example Config
Service Rate Config

Each service can have as many rates as desired. Users will have the option to select these rates in a dropdown when scheduling. Rates for scheduled events have 7 needed configuration options:
- Rate Name - The name displayed in the rate dropdown.
- Type - The type of the rate charge
- Per Hour - Charge based on the length of the event in question split correspondingly over the on and off hours used
- Per Run - Charge a flat fee for the event regardless of duration
- On Hours Rate - The rate to charge at for usage that occurs during On Hours as defined in the "Blocked/Off-Hours" configuration section. This rate should be the "At Cost" internal charge rate.
- Off Hours Rate - The rate to charge at for usage that occurs during Off Hours as defined in the "Blocked/Off-Hours" configuration section. This rate should be the "At Cost" internal charge rate.
- Commercial On Hours Rate - The rate to charge at for usage that occurs during On Hours as defined in the "Blocked/Off-Hours" configuration section. This rate can be any rate but should be no less than the internal cost.
- Commercial Off Hours Rate - The rate to charge at for usage that occurs during Off Hours as defined in the "Blocked/Off-Hours" configuration section. This rate can be any rate but should be no less than the internal cost.
- Display Color - The color that any event scheduled at this rate should be appear as when viewed on the calendar. Accepts any valid CSS color string. Can be blank.
All config fields MUST be filled out except the display color regardless of whether you expect to be handling commercial orders on the service. Since users are responsible for selecting their own accounts you cannot control which type of account might be selected for charging the order. If you do not have commercial rates for your services using 2x the internal rate is a safe choice. All fields must ALSO be filled out if you are doing "Per Run" rates.
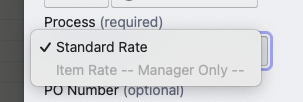
Service Rate Permissions
Service Rates can be restricted to group managers only. Click on the lock icon and check the "Manager Only" box
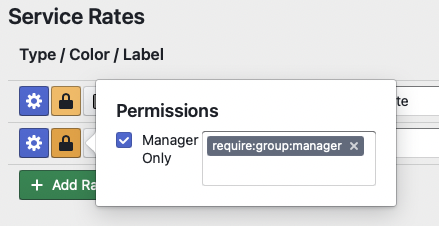
Rates marked as such will appear to users as disabled.
Service Auto-Charges / Fees Config
Each service can also be configured to automatically attach separate fees for service (apart from the hourly charge) to events created. These charges will be attached at the time that the event is created and can be either Fixed Fees or Duration Linked. In both cases the line item description will be the information provided in the "Fee Description" field.

- Fixed Fee - Fixed Fees are attached to the order as a line item and will remain the same regardless of event duration. This can be used to apply setup fees or other one time charges.
- Duration Linked - Duration linked fees are applied to events on the basis of their total duration. The charge will be equal to the Rate * Rate Multiplier * Total Event Duration in hours. This can be used to attach charges for consumables usage.
Line Item Service Configuration
Line Item services for the resource system represent an order for services that have an item quantity and price per item. Generally this means that any service that is not a scheduled service is treated as a line item service. Configuration of a line item service is broken down into a number of sections identified below. Line Item services share most of their configuration with scheduled services.
Creating a new service
A new service can be created by clicking the "Create New Service" button located above the service list search box
Newly created services will not exist until saved after initial configuration. This means that some functionality that needs an id number such as creating service rates will not be available until the user click the "Save" button to save a newly created service.
Identifiers
- Record ID - The system ID number identifying the service
- Name - The display name of the service in question.
- Type - The type of the service. Defaults to "Scheduled"
- Parent Group - The group to which this service belongs. Defaults to the currently active group but may be changed to any group that the creating user is listed as a manager for
Visuals
- Color - The color of the button to access the service as it appears in the group services list. This field will accept and valid CSS color in string format. Ex:
- Display Weight - How high in the list a service will be displayed. Higher values will display first. Ex: 10 will appear after 50
- Display Path - For facilities with large numbers of instruments / services it can be helpful to have some additional level of organization. The display path setting allows managers to organize services into folder style nested groupings. The convention follow standard unix pathing conventions. Ex: "/Microscopes/" will display the given service under an expandable section with all other services that have the same configuration.
Contact Information
- Location - The location the service is located at. This field is optional and will display after the service name on the list of services
- Contact Email - The list of email addresses that should be send a notification message. The contact email list can be configured to send emails to any number of addresses. Generally this will be the email of the person or persons responsible for managing the instrument. Email contacts can be configured to receive emails on the following events:
- All Events - Send a notification for order creation, deletion, and update actions
- Only Create - Send a notification on order creation
- Only Update - Send a notification on order update
- Only Delete - Send a notification on order deletion
- Note: The contact email configuration does NOT override the general "Notification Verbosity" setting for the service. If a service is configured to suppress all notification messages then no emails will be sent regardless of the contact email configuration. Also note that Line Item orders only generate "Create" notifications.
General Config
- Enabled - Whether this services is actively in use
- Yes - Active
- No - Inactive
- Archived - Inactive and hidden from search list. (Used for removing services from general use and declutting un-used service records
- Notification Verbosity - When to send notification emails for actions that occur on the service
- No Messages - No notifications sent
- On Create - Only send order creation notifications
- On Delete Only - Only send event deletion notifications (Delete not applicable for Line Item Orders)
- On Create/Delete - Only order notification when an event is created or deleted (Delete not applicable for Line Item Orders)
- All Messages - Send notification for all event creation, update, and delete actions (Delete and Update not applicable for Line Item Orders)
- Manager Only - Controls if service is visible/available to all users of a facility or just facility managers
Tags
Tag strings used by the system for categorization and certain actions. No special tags are defined for services at this time.
Custom Data Config

Some services may require additional information to perform. Up to 5 custom data fields may be enabled for the ordring user to enter custom information. These custom fields will appear as text input boxes at the bottom of the line details with the provided data label/query.
Service Presets

Line item services have presets instead of rates. These presets serve a variety of purposes depending on the the type of service. For "Line Item" and "Order Form" type services the line presets serve as pre-filled lines. The only difference between a "Line Item" and "Order Form" service is that "Line Item" services allow ordering users to add manual lines to the order. Line item services can have zero or more presets. Generally "Line Item" type services will have no presets and serve as a manager only order form. Service presets have 7 configuration fields of which the first 4 are required:
- Label - The Description to be attached to this line item
- Type - The line preset type
- Per Item - A fully configurable/removable line item

- Per Item (Required - Editable) - A order form line item with a alterable quantity

- Per Item (Required - Fixed) - An uneditable "fee" style line item

- Per Item - A fully configurable/removable line item
- Per Item Rate - The cost per item to default to or enforce
- Commercial Rate - The cost per item to default to or enforce for commercial accounts
- Minimum Quantity - The smallest number of this item the user can select. (Serves as the default field value, only enforced on (Required) preset types)
- Maximum Quantity - The largest number of this item the user can order. Defaults to 0 where 0 allows unlimited quantities. (Only enforced on (Required) preset types for values above 0)
- Conditional Fee - Used by the BBSP and other Sample Processing service types. No effect for general line item services.


Order Form Service Configuration
Line Item services for the resource system represent an order for services that have an item quantity and price per item. Generally this means that any service that is not a scheduled service is treated as a line item service. Configuration of a line item service is broken down into a number of sections identified below. Line Item services share most of their configuration with scheduled services.
Creating a new service
A new service can be created by clicking the "Create New Service" button located above the service list search box
Newly created services will not exist until saved after initial configuration. This means that some functionality that needs an id number such as creating service rates will not be available until the user click the "Save" button to save a newly created service.
Identifiers
- Record ID - The system ID number identifying the service
- Name - The display name of the service in question.
- Type - The type of the service. Defaults to "Scheduled"
- Parent Group - The group to which this service belongs. Defaults to the currently active group but may be changed to any group that the creating user is listed as a manager for
Visuals
- Color - The color of the button to access the service as it appears in the group services list. This field will accept and valid CSS color in string format. Ex:
- Display Weight - How high in the list a service will be displayed. Higher values will display first. Ex: 10 will appear after 50
- Display Path - For facilities with large numbers of instruments / services it can be helpful to have some additional level of organization. The display path setting allows managers to organize services into folder style nested groupings. The convention follow standard unix pathing conventions. Ex: "/Microscopes/" will display the given service under an expandable section with all other services that have the same configuration.
Contact Information
- Location - The location the service is located at. This field is optional and will display after the service name on the list of services
- Contact Email - The list of email addresses that should be send a notification message. The contact email list can be configured to send emails to any number of addresses. Generally this will be the email of the person or persons responsible for managing the instrument. Email contacts can be configured to receive emails on the following events:
- All Events - Send a notification for order creation, deletion, and update actions
- Only Create - Send a notification on order creation
- Only Update - Send a notification on order update
- Only Delete - Send a notification on order deletion
- Note: The contact email configuration does NOT override the general "Notification Verbosity" setting for the service. If a service is configured to suppress all notification messages then no emails will be sent regardless of the contact email configuration. Also note that Line Item orders only generate "Create" notifications.
General Config
- Enabled - Whether this services is actively in use
- Yes - Active
- No - Inactive
- Archived - Inactive and hidden from search list. (Used for removing services from general use and declutting un-used service records
- Notification Verbosity - When to send notification emails for actions that occur on the service
- No Messages - No notifications sent
- On Create - Only send order creation notifications
- On Delete Only - Only send event deletion notifications (Delete not applicable for Line Item Orders)
- On Create/Delete - Only order notification when an event is created or deleted (Delete not applicable for Line Item Orders)
- All Messages - Send notification for all event creation, update, and delete actions (Delete and Update not applicable for Line Item Orders)
- Manager Only - Controls if service is visible/available to all users of a facility or just facility managers
Tags
Tag strings used by the system for categorization and certain actions. No special tags are defined for services at this time.
Custom Data Config
Some services may require additional information to perform. Up to 5 custom data fields may be enabled for the ordring user to enter custom information. These custom fields will appear as text input boxes at the bottom of the line details with the provided data label/query.
Service Presets
Line item services have presets instead of rates. These presets serve a variety of purposes depending on the the type of service. For "Line Item" and "Order Form" type services the line presets serve as pre-filled lines. The only difference between a "Line Item" and "Order Form" service is that "Line Item" services allow ordering users to add manual lines to the order. Line item services can have zero or more presets. Generally "Line Item" type services will have no presets and serve as a manager only order form. Service presets have 7 configuration fields of which the first 4 are required:
- Label - The Description to be attached to this line item
- Type - The line preset type
- Per Item - A fully configurable/removable line item
- Per Item (Required - Editable) - A order form line item with a alterable quantity
- Per Item (Required - Fixed) - An uneditable "fee" style line item
- Per Item - A fully configurable/removable line item
- Per Item Rate - The cost per item to default to or enforce
- Commercial Rate - The cost per item to default to or enforce for commercial accounts
- Minimum Quantity - The smallest number of this item the user can select. (Serves as the default field value, only enforced on (Required) preset types)
- Maximum Quantity - The largest number of this item the user can order. Defaults to 0 where 0 allows unlimited quantities. (Only enforced on (Required) preset types for values above 0)
- Conditional Fee - Used by the BBSP and other Sample Processing service types. No effect for general line item services.
Black Box Sample Processing Service Config
Black Box Sample Processing (BBSP) services for the resource system represent an order for services that have an item quantity and price per item. BBSP Services also include limited sample configuration and data storage ability.
Creating a new service
A new service can be created by clicking the "Create New Service" button located above the service list search box
Newly created services will not exist until saved after initial configuration. This means that some functionality that needs an id number such as creating service rates will not be available until the user click the "Save" button to save a newly created service.
Identifiers
- Record ID - The system ID number identifying the service
- Name - The display name of the service in question.
- Type - The type of the service. Defaults to "Scheduled"
- Parent Group - The group to which this service belongs. Defaults to the currently active group but may be changed to any group that the creating user is listed as a manager for
Visuals
- Color - The color of the button to access the service as it appears in the group services list. This field will accept and valid CSS color in string format. Ex:
- Display Weight - How high in the list a service will be displayed. Higher values will display first. Ex: 10 will appear after 50
- Display Path - For facilities with large numbers of instruments / services it can be helpful to have some additional level of organization. The display path setting allows managers to organize services into folder style nested groupings. The convention follow standard unix pathing conventions. Ex: "/Microscopes/" will display the given service under an expandable section with all other services that have the same configuration.
Contact Information
- Location - The location the service is located at. This field is optional and will display after the service name on the list of services
- Contact Email - The list of email addresses that should be send a notification message. The contact email list can be configured to send emails to any number of addresses. Generally this will be the email of the person or persons responsible for managing the instrument. Email contacts can be configured to receive emails on the following events:
- All Events - Send a notification for order creation, deletion, and update actions
- Only Create - Send a notification on order creation
- Only Update - Send a notification on order update
- Only Delete - Send a notification on order deletion
- Note: The contact email configuration does NOT override the general "Notification Verbosity" setting for the service. If a service is configured to suppress all notification messages then no emails will be sent regardless of the contact email configuration. Also note that Line Item orders only generate "Create" notifications.
General Config
- Enabled - Whether this services is actively in use
- Yes - Active
- No - Inactive
- Archived - Inactive and hidden from search list. (Used for removing services from general use and declutting un-used service records
- Notification Verbosity - When to send notification emails for actions that occur on the service
- No Messages - No notifications sent
- On Create - Only send order creation notifications
- On Delete Only - Only send event deletion notifications (Delete not applicable for Line Item Orders)
- On Create/Delete - Only order notification when an event is created or deleted (Delete not applicable for Line Item Orders)
- All Messages - Send notification for all event creation, update, and delete actions (Delete and Update not applicable for Line Item Orders)
- Manager Only - Controls if service is visible/available to all users of a facility or just facility managers
Tags
Tag strings used by the system for categorization and certain actions. No special tags are defined for services at this time.
Custom Data Config
Some services may require additional information to perform. Up to 5 custom data fields may be enabled for the ordring user to enter custom information. These custom fields will appear as text input boxes at the bottom of the line details with the provided data label/query.
Service Presets
Service presets for the BBSP system function as

- Process Type - The name of the process to be selected. Users will be able to select among the provided presets.
- Type - Whether the preset should be treated as a required fee or as a process to be performed on samples
- Process - Charge Per Sample
- Unused (1) - Can be selected if service is converted from another service type
- Unused (2) - Can be selected if service is converted from another service type
- $/Sample - The rate to charge per sample
- $/Sample (Commercial) - The rate to charge per sample
- Min Sample # - The minimum number of samples a user needs to submit to be able to select this process
- Maximum Quantity - The maximum number of samples a user can to submit to be able to select this process
Data Collection Form Config
Black Box Sample Processing (BBSP) services for the resource system represent an order for services that have an item quantity and price per item. BBSP Services also include limited sample configuration and data storage ability.
Creating a new service
A new service can be created by clicking the "Create New Service" button located above the service list search box
Newly created services will not exist until saved after initial configuration. This means that some functionality that needs an id number such as creating service rates will not be available until the user click the "Save" button to save a newly created service.
Identifiers
- Record ID - The system ID number identifying the service
- Name - The display name of the service in question.
- Type - The type of the service. Defaults to "Scheduled"
- Parent Group - The group to which this service belongs. Defaults to the currently active group but may be changed to any group that the creating user is listed as a manager for
Visuals
- Color - The color of the button to access the service as it appears in the group services list. This field will accept and valid CSS color in string format. Ex:
- Display Weight - How high in the list a service will be displayed. Higher values will display first. Ex: 10 will appear after 50
- Display Path - For facilities with large numbers of instruments / services it can be helpful to have some additional level of organization. The display path setting allows managers to organize services into folder style nested groupings. The convention follow standard unix pathing conventions. Ex: "/Microscopes/" will display the given service under an expandable section with all other services that have the same configuration.
Contact Information
- Location - The location the service is located at. This field is optional and will display after the service name on the list of services
- Contact Email - The list of email addresses that should be send a notification message. The contact email list can be configured to send emails to any number of addresses. Generally this will be the email of the person or persons responsible for managing the instrument. Email contacts can be configured to receive emails on the following events:
-
All Events - Send a notification for form creation, deletion, and update actions
- Only Create - Send a notification on form creation
- Only Update - Send a notification on form update
- Only Delete - Send a notification on form deletion
-
- Note: The contact email configuration does NOT override the general "Notification Verbosity" setting for the service. If a service is configured to suppress all notification messages then no emails will be sent regardless of the contact email configuration. Also note that Line Item orders only generate "Create" notifications.
General Config
- Enabled - Whether this services is actively in use
- Yes - Active
- No - Inactive
- Archived - Inactive and hidden from search list. (Used for removing services from general use and declutting un-used service records
- Notification Verbosity - When to send notification emails for actions that occur on the service
- No Messages - No notifications sent
- On Create - Only send order creation notifications
- On Delete Only - Only send event deletion notifications (Delete not applicable for Line Item Orders)
- On Create/Delete - Only order notification when an event is created or deleted (Delete not applicable for Line Item Orders)
- All Messages - Send notification for all event creation, update, and delete actions (Delete and Update not applicable for Line Item Orders)
- Manager Only - Controls if service is visible/available to all users of a facility or just facility managers
Tags
Tag strings used by the system for categorization and certain actions. No special tags are defined for services at this time.
Form Configuration Manager
Custom data collection forms can be configured to collect any desired data including digital signatures from submitters.

- Title - The title of the form
- Allow Editing
- Yes (all) - Allow users to edit form submissions after submission
- Yes (Recieved Only) - Allow users to edit form submission as long as they are in the "Received" state
- No - Disallow form editing after submission
- Current Fields - Control and edit the forms for this data collection form

- Label Field - Used to set the name of the field
- Data Key Field - Defines the name of the storage variable. Should be unique across all fields
- Field Type Selector
- Markdown Block - Display a markdown formatted section of text
- Text Field - Single Line Text Field
- Text Area - Multi-line text field
- Number - Floating point number field
- Select - Single Item select
- Multi-Select - multiple item select
- Section Divider - Section Divider with or without title
- Signature Block - Email target for signature request
- Field Details/Config Button - Displays field type configurations
- Markdown Block

- Text Field - Single Line Text Field
- Text Area - Multi-line text field
- Number - Floating point number field

- Select - Single Item select
- Multi-Select - multiple item select

- Section Divider - Section Divider with or without title
- Signature Block - Email target for signature request
- Markdown Block
- Move Field Up - Alters display position of field
- Move Field Down - Alters display position of field
- Copy Field Button
- Remove Field Button


Webhook / Interlock Configuration
Overview
Occasionally it can be desirable to trigger remote actions in response to actions that occur in the resource system. Use cases include remote logging or instrument interlock control. To support these remote actions the resource system provides HTTP webhooks for the following actions:
- Order Creation
- Order Updates
- Order Deletion
- Event Creation
- Event Updates
- Event Deletion
- Interlock Unlock Request
- Interlock Status Request
- Interlock Lock Request
Using the Service Webhook Manager facility staff can configure single or multiple webhooks to be triggered when any of the above events occur.
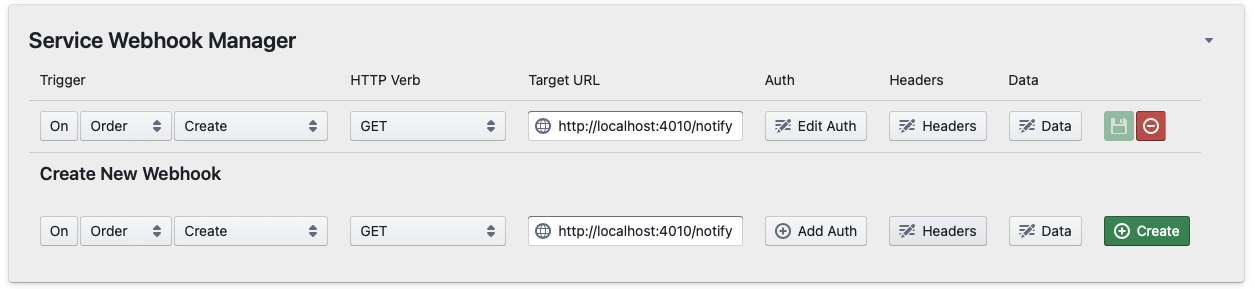
Configurations can be specified for HTTP Headers, HTTP Auth, request HTTP Verb/Type and request body data.
Note: all request bodies will be encoded as "application/json"
HTTP Verb/Type settings can be set to standard or "insecure". Insecure requests will ignore all TLS certificate errors and are not recommended.
Payload
By default the payload for requests will include the following in the request body:
- Order ID (order_id)
- Line Item or Event ID (line_id / event_id)
Any additional data elements as configured by the webhook settings will be attached to the data object.
Data keyed with the same key as any of the above will be OVERWRITTEN by the system provided value
Multiple Webhooks
Multiple webhooks on the same event can be configured. Order of execution is NOT guaranteed.
Interlock Configuration
Interlocks are a special use case for webhooks. Scheduled instruments/services can be configured to display an interlock control UI element by attaching the has_interlock tag to the service in question under the "Service Tags" configuration using the "Manual Tag Wizard"

After event creation / during event viewing services with this tag will display a set of interlock controls

Facility Staff and System Administrators will see interlock controls at all times and on all events. Instrument Users will only see the interlock controls between 5 minutes before the scheduled start of the event and 30 minutes after the scheduled end of the event.
The 3 actions correspond to the "interlock" action type and subtype.

The lock and unlock actions are "push-only" webhooks. Any response traffic to these calls is discarded. Valid HTTP Error codes will generate an error message with the reason for the error displayed.
The "Query Lock Status" action will parse the response from the target and expects an "application/json" body with a "status" key containing either a "locked" or "unlocked" value.
Walkup Service Configuration
For services that are publicly accessible and do not need to be scheduled in advance the resource system supports "Walkup" events. Rather than creating a reservation event these services create a timed record of use. The system creates a "pending" walkup event at the time that use is started and closes out the the event when use is completed by creating an event and order based on the walkup event duration. It is important to note that walkup events do NOT check for collisions when they are created and so overlapping usages can occur.
Unlike scheduled services, Walkup service events cannot be edited after creation. While there is a calendar view for the events this is primarily for user convenience and events cannot be altered from the calendar.
Creating a new service
A new walkup service can be created by clicking the "Create New Service" button located above the service list search box. Walkup services are functionally identical to a scheduled service from a configuration standpoint.
Newly created services will not exist until saved after initial configuration. This means that some functionality that needs an id number such as creating service rates will not be available until the user click the "Save" button to save a newly created service.
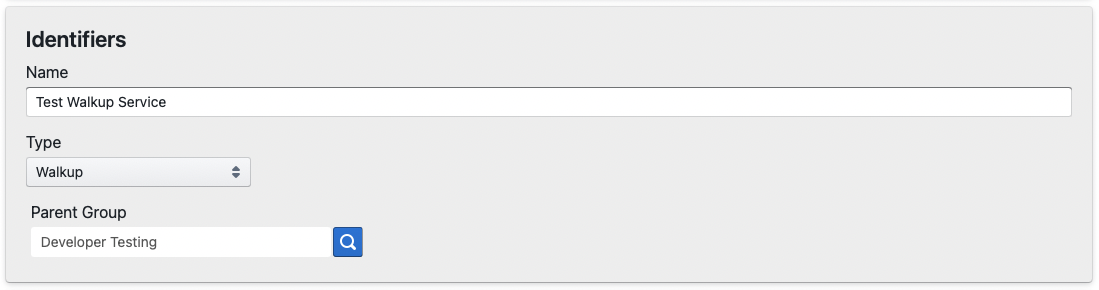
Identifiers
- Record ID - The system ID number identifying the service
- Name - The display name of the service in question.
- Type - The type of the service. Defaults to "Scheduled"
- Parent Group - The group to which this service belongs. Defaults to the currently active group but may be changed to any group that the creating user is listed as a manager for
Visuals
- Color - The color of the button to access the service as it appears in the group services list. This field will accept and valid CSS color in string format. Ex:
- Display Weight - How high in the list a service will be displayed. Higher values will display first. Ex: 10 will appear after 50
- Display Path - For facilities with large numbers of instruments / services it can be helpful to have some additional level of organization. The display path setting allows managers to organize services into folder style nested groupings. The convention follow standard unix pathing conventions. Ex: "/Microscopes/" will display the given service under an expandable section with all other services that have the same configuration.
Contact Information
- Location - The location the service is located at. This field is optional and will display after the service name on the list of services
- Contact Email - The list of email addresses that should be send a notification message. The contact email list can be configured to send emails to any number of addresses. Generally this will be the email of the person or persons responsible for managing the instrument. Email contacts can be configured to receive emails on the following events:
- All Events - Send a notification for event creation, deletion, and update actions
- Only Create - Send a notification on event creation
- Only Update - Send a notification on event update
- Only Delete - Send a notification on event deletion
The contact email configuration does NOT override the general "Notification Verbosity" setting for the service. If a service is configured to suppress all notification messages then no emails will be sent regardless of the contact email configuration
General Config
- Enabled - Whether this services is actively in use
- Yes - Active
- No - Inactive
- Archived - Inactive and hidden from search list. (Used for removing services from general use and declutting un-used service records
- Notification Verbosity - When to send notification emails for actions that occur on the service
- No Messages - No notifications sent
- On Create - Only send event creation notifications
- On Delete Only - Only send event deletion notifications
- On Create/Delete - Only send notification when an event is created or deleted
- All Messages - Send notification for all event creation, update, and delete actions
- Manager Only - Controls if service is visible/available to all users of a facility or just facility managers
Tags
Tag strings used by the system for categorization and certain actions. No special tags are defined for services at this time.
Scheduler Config
- Allow After Hours Access - Controls if the blocked times are treated as "After Hours" or "Blocked"
- No - Time blocks are not accessible to general users. Administrators and Managers may still schedule in "Blocked" times
- Yes - Allow users with explicitly granted "After Hours" permissions to schedule during off-hours
- Yes (All Users) - Allow any user to schedule time during off-hours
-
The recommended setting for after hours access is Yes (All Users) for walkup services.
- Exclude from Billing - Controls if any orders created on this service are automatically excluded from billing. Useful if a service is provided for free.
- Lead Time - Determines how many days in advance a user must schedule. 0 or empty is no lead time.
-
The lead time for walkup services is always ignored
- Allow Scheduling inside Lead - Controls if a user may create (but not update or delete) an event inside the lead time. Useful for services that can be scheduled quickly (filling a last minute cancellation) but need special attention on cancellation.
- Maximum Lead Time - The maximum number of days in advance a service can be scheduled by a user. Useful for preventing users from "camping" time slots for months in advance that they may not use.
-
This setting has no effect for walkup instrumentation since all walkup events are inside the max lead time.
- Scheduling Interval - The minimum "block" size of a scheduled event. Accepts sizes from 1 minute to 1 week.
-
The recommended interval for walkup services is 1 minute
- Interevent Gap Duration - The minimum amount of time between service uses. Useful if a service has setup/teardown needs.
Blocked/Off-Hours Times
This section controls what times during the week are treated as Off or Blocked hours during which altered rates may be applied or access may be blocked entirely. Time formats are in 24 hour formats. Defaults to no limits. Common times are 00:00 - 09:00 and 17:00 - 24:00 to give a 9am to 5pm working day.
Custom Data Config
This config section has no effect on Walkup Services
Service Rate Config

Each service can have as many rates as desired. Users will have the option to select these rates in a dropdown when scheduling. Rates for scheduled events have 7 needed configuration options:
- Rate Name - The name displayed in the rate dropdown.
- Type - The type of the rate charge
- Per Hour - Charge based on the length of the event in question split correspondingly over the on and off hours used
- Per Run - Charge a flat fee for the event regardless of duration
- On Hours Rate - The rate to charge at for usage that occurs during On Hours as defined in the "Blocked/Off-Hours" configuration section. This rate should be the "At Cost" internal charge rate.
- Off Hours Rate - The rate to charge at for usage that occurs during Off Hours as defined in the "Blocked/Off-Hours" configuration section. This rate should be the "At Cost" internal charge rate.
- Commercial On Hours Rate - The rate to charge at for usage that occurs during On Hours as defined in the "Blocked/Off-Hours" configuration section. This rate can be any rate but should be no less than the internal cost.
- Commercial Off Hours Rate - The rate to charge at for usage that occurs during Off Hours as defined in the "Blocked/Off-Hours" configuration section. This rate can be any rate but should be no less than the internal cost.
- Display Color - The color that any event scheduled at this rate should be appear as when viewed on the calendar. Accepts any valid CSS color string. Can be blank.
All config fields MUST be filled out except the display color regardless of whether you expect to be handling commercial orders on the service. Since users are responsible for selecting their own accounts you cannot control which type of account might be selected for charging the order. If you do not have commercial rates for your services using 2x the internal rate is a safe choice. All fields must ALSO be filled out if you are doing "Per Run" rates.
Service Auto-Charges / Fees Config
Each service can also be configured to automatically attach separate fees for service (apart from the hourly charge) to events created. These charges will be attached at the time that the event is created and can be either Fixed Fees or Duration Linked. In both cases the line item description will be the information provided in the "Fee Description" field.
- Fixed Fee - Fixed Fees are attached to the order as a line item and will remain the same regardless of event duration. This can be used to apply setup fees or other one time charges.
- Duration Linked - Duration linked fees are applied to events on the basis of their total duration. The charge will be equal to the Rate * Rate Multiplier * Total Event Duration in hours. This can be used to attach charges for consumables usage.
Service Status Management
The status of services can be communicated to users from the main service list in a given facility. This functionality provides the ability to visually communicate to users what the status of a given instrument/service is. Available statuses include:


This functionality can be enabled/managed by clicking on the service icon for services you are a manager on. If you are not a manager you will be unable to access the feature.

For the degraded and disabled statuses users will also see a warning message at the top of their event details.

Setting the instrument status does NOT affect the user's ability to scheduled on a service. This function is for informational purposes only.
Data Collection Form Sub-system
Creating a Data Collection Form
Creating a new service
A new service can be created by clicking the "Create New Service" button located above the service list search box
Newly created services will not exist until saved after initial configuration. This means that some functionality that needs an id number such as creating service rates will not be available until the user click the "Save" button to save a newly created service.
Identifiers
- Record ID - The system ID number identifying the service
- Name - The display name of the service in question.
- Type - The type of the service. Defaults to "Scheduled"
- Parent Group - The group to which this service belongs. Defaults to the currently active group but may be changed to any group that the creating user is listed as a manager for
Visuals
- Color - The color of the button to access the service as it appears in the group services list. This field will accept and valid CSS color in string format. Ex:
- Display Weight - How high in the list a service will be displayed. Higher values will display first. Ex: 10 will appear after 50
- Display Path - For facilities with large numbers of instruments / services it can be helpful to have some additional level of organization. The display path setting allows managers to organize services into folder style nested groupings. The convention follow standard unix pathing conventions. Ex: "/Microscopes/" will display the given service under an expandable section with all other services that have the same configuration.
Contact Information
- Location - The location the service is located at. This field is optional and will display after the service name on the list of services
- Contact Email - The list of email addresses that should be send a notification message. The contact email list can be configured to send emails to any number of addresses. Generally this will be the email of the person or persons responsible for managing the instrument. Email contacts can be configured to receive emails on the following events:
-
All Events - Send a notification for form creation, deletion, and update actions
- Only Create - Send a notification on form creation
- Only Update - Send a notification on form update
- Only Delete - Send a notification on form deletion
-
- Note: The contact email configuration does NOT override the general "Notification Verbosity" setting for the service. If a service is configured to suppress all notification messages then no emails will be sent regardless of the contact email configuration. Also note that Line Item orders only generate "Create" notifications.
General Config
- Enabled - Whether this services is actively in use
- Yes - Active
- No - Inactive
- Archived - Inactive and hidden from search list. (Used for removing services from general use and declutting un-used service records
- Notification Verbosity - When to send notification emails for actions that occur on the service
- No Messages - No notifications sent
- On Create - Only send order creation notifications
- On Delete Only - Only send event deletion notifications (Delete not applicable for Line Item Orders)
- On Create/Delete - Only order notification when an event is created or deleted (Delete not applicable for Line Item Orders)
- All Messages - Send notification for all event creation, update, and delete actions (Delete and Update not applicable for Line Item Orders)
Tags
Tag strings used by the system for categorization and certain actions. No special tags are defined for services at this time.
Form Configuration Manager
Custom data collection forms can be configured to collect any desired data including digital signatures from submitters.
- Title - The title of the form
- Allow Editing
- Yes (all) - Allow users to edit form submissions after submission
- Yes (Recieved Only) - Allow users to edit form submission as long as they are in the "Received" state
- No - Disallow form editing after submission
- Current Fields - Control and edit the forms for this data collection form
- Label Field - Used to set the name of the field
- Data Key Field - Defines the name of the storage variable. Should be unique across all fields
- Field Type Selector
- Markdown Block - Display a markdown formatted section of text
- Text Field - Single Line Text Field
- Text Area - Multi-line text field
- Number - Floating point number field
- Select - Single Item select
- Multi-Select - multiple item select
- Section Divider - Section Divider with or without title
- Signature Block - Email target for signature request
- Field Details/Config Button - Displays field type configurations
- Markdown Block
- Text Field - Single Line Text Field
- Text Area - Multi-line text field
- Number - Floating point number field
- Select - Single Item select
- Multi-Select - multiple item select
- Section Divider - Section Divider with or without title
- Signature Block - Email target for signature request
- Markdown Block
- Move Field Up - Alters display position of field
- Move Field Down - Alters display position of field
- Copy Field Button
- Remove Field Button
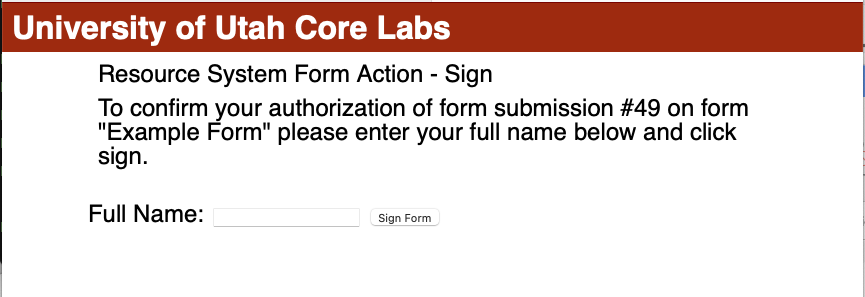
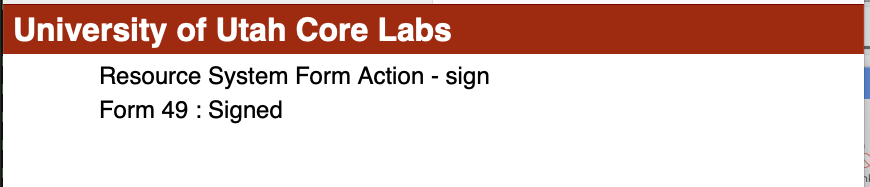
Signature Blocks
Custom Data Forms can be used to collect approvals from anyone who has an email address. The email address of the person who is supposed to approve the submission will receive an email with an approval link included in it.
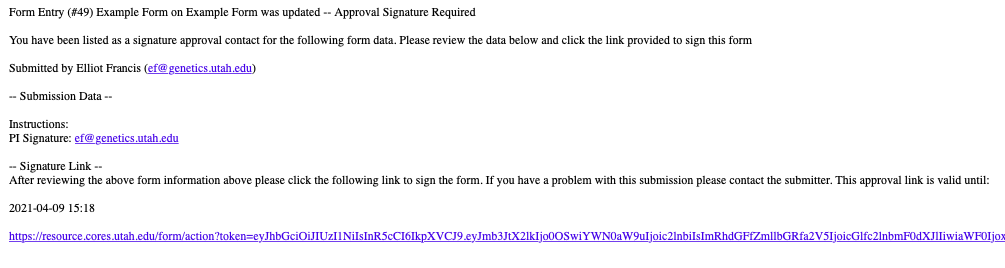
The can then click on the link and will be prompted to provide a digital "signature" in the form of their full name.
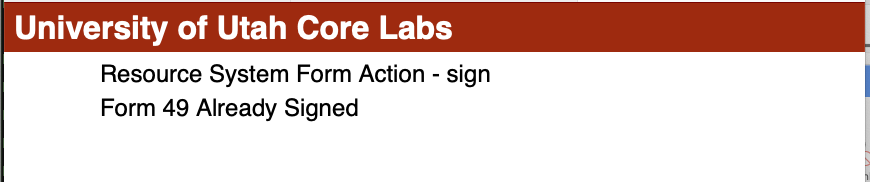
If the form has already been signed the system will display a notification AFTER the signature has been submitted.
Custom Form Configuration Overview
Custom data collection forms can be configured to collect any desired data including digital signatures from submitters.
- Title - The title of the form
- Allow Editing
- Yes (all) - Allow users to edit form submissions after submission
- Yes (Recieved Only) - Allow users to edit form submission as long as they are in the "Received" state
- No - Disallow form editing after submission
- Current Fields - Control and edit the forms for this data collection form
- Label Field - Used to set the name of the field
- Data Key Field - Defines the name of the storage variable. Should be unique across all fields
- Field Type Selector
- Markdown Block - Display a markdown formatted section of text
- Text Field - Single Line Text Field
- Text Area - Multi-line text field
- Number - Floating point number field
- Select - Single Item select
- Multi-Select - multiple item select
- Section Divider - Section Divider with or without title
- Signature Block - Email target for signature request
- Field Details/Config Button - Displays field type configurations
- Markdown Block
- Text Field - Single Line Text Field
- Text Area - Multi-line text field
- Number - Floating point number field
- Select - Single Item select
- Multi-Select - multiple item select
- Section Divider - Section Divider with or without title
- Signature Block - Email target for signature request
- Duration (Time) - Time Only Duration Entry Field
- Charge Calculation - Generate a line item charge based on a given set of calculations from other fields in the form

- Markdown Block
- Move Field Up - Alters display position of field
- Move Field Down - Alters display position of field
- Copy Field Button
- Remove Field Button

Charge Calculation Fields
Charge calculation fields represent fields that use other fields as inputs to generate a line item order upon order submission. Charge calculation fields may be either optional or required. Fields marked as optional may be submitted with 0 or undefined/null values and the results will be ignored/dropped if invalid resulting in no line item will be created for that field. Required fields will need to have a valid final value prior to submission. Forms will generate 1 line item in the order per valid charge calculation field result.
Valid input field types for Charge Calculation Fields include the following field types:
- Number
- Dropdown
- Select
Dropdown and Select field options MUST be valid parse-able floating point values. Invalid values will result in an error message (See: https://developer.mozilla.org/en-US/docs/Web/JavaScript/Reference/Global_Objects/parseFloat ). Dropdown/Select values MUST take the format of either a number OR "<select_value>@<value_floating_point_number>".
Ex: "gold@123.45"
Managers may test numerical values in the the "Test Results" section to observe field calculation results behavior. All available fields with valid types will be listed as inputs in the test results section. For additional information on the math engine used for handling the equation strings see https://mathjs.org/
Note that both an Internal and Commercial Cost Equation are required for proper functionality.

If a required charge calculation is missing an input or generates a negative/null result value the field will generate an error message and the form will be un-submittable with "(Invalid/Missing Fields)" as the button message.

Forms with Charge Calculations may be configured to automatically generate new orders on submission OR to require manual review after the form is submitted.

Form submissions with orders attached to them will have their input fields DISABLED from further editing. Processing status can still be adjusted but inputs will be disabled. Do not create an order for a form submission unless you are sure the inputs are correct.

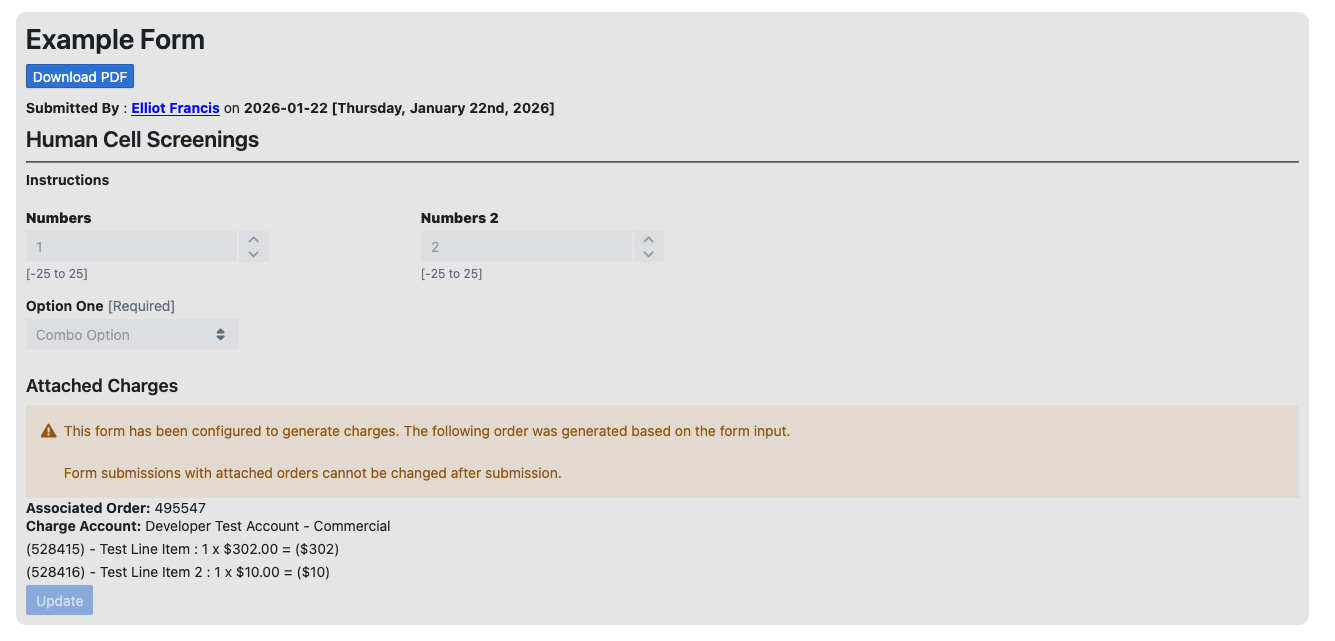

Users submitting forms with charge lines will be required to select an associated charge account. Mangers may change the target field AFTER order creation through the normal approval process for orders.

Managing News
Creating News Items
To create a news item go to the Group for which the item is to be created. If you have manager permission on the group you should see the "Add News Item" button above the News Item List.
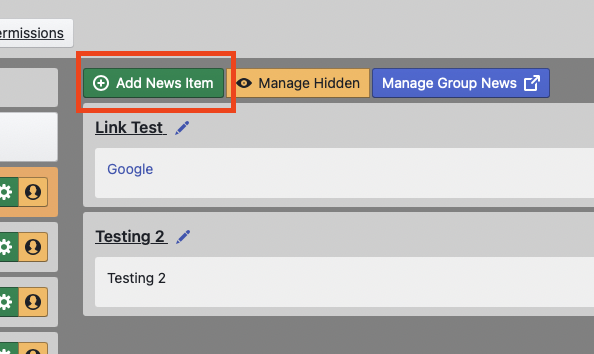
Click the "Add News Item" button and fill out the news item content.
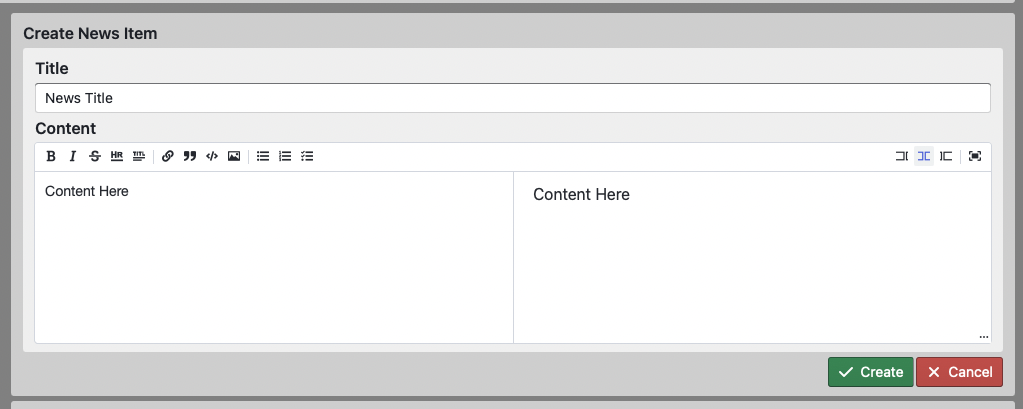
Once the content is filled out click the "Create" button to save the news item. Once the save button is clicked the news item should appear at the top of the news scroll.

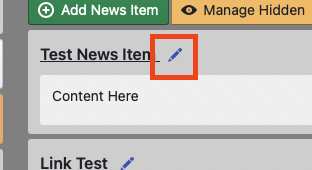
Editing News / Pinned News
News Items can be edited by clicking on the edit icon located next to the news title.
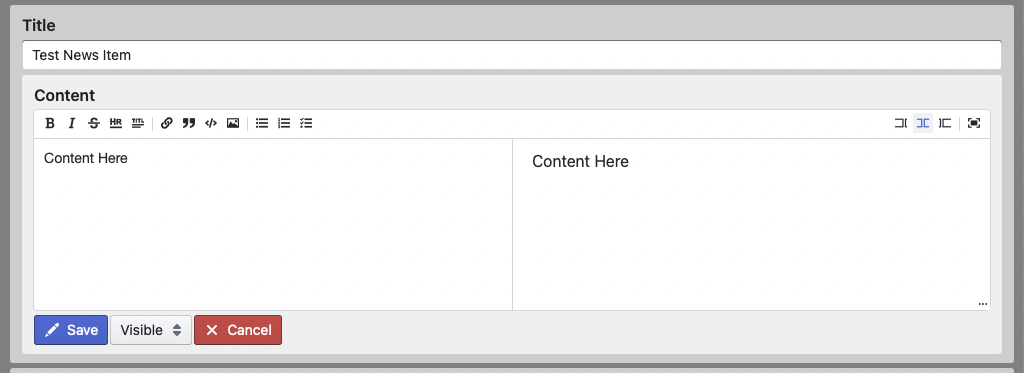
Once edits are complete click the save button to persist the changes.
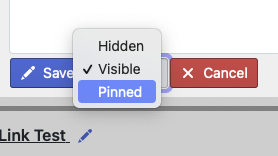
News items cannot be deleted. If you need to hide a news item set it's status to "Hidden"
You may want to have a news item always appear at the top of the list if it has important information. News items can be pinned to the top of the list. Multiple pinned items will still display most recent pinned item first.
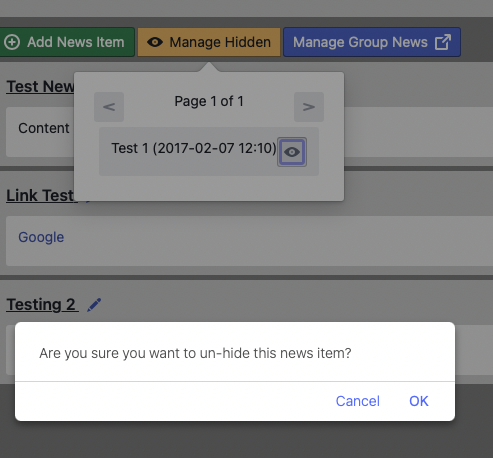
Unhiding News Items
If you need to recover a news item or make it visible again you can click on the "Manage Hidden" button to view all hidden news items.
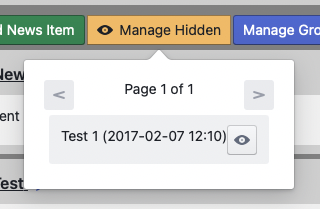
To un-hide an item click on the eye icon next to the title and timestamp.
Quote System
Creating a Quote
To create a quote for a facility a user must be listed as a manager on that facility. Users may be listed as managers on multiple facilities. If so care must be taken to select the correct facility that the quote is being created for. To create a quote use the following steps:
- Click on the "Quotes" tab.

- Select the facility to generate a quote for.

- Click the "Create New Quote" button

- Fill out the quote wizard.

- Valid To Date - This is when the quote is set to expire. By default this is 1 month from the current date.
- Delivery Date - This is an optional field that can be used to specify the "Date of Delivery/Date of Service". If this field is not set then it will not appear on the quote in question. The orange button to the left of this field may be used to clear the field.
- Status - A dropdown indicator showing the status of this quote inside a list of all possible quote statues.
- Recipient Name - The name of the individual for whom this quote is intended. This may be the name of an individual, organization, or company.
- Recipient Price Type - This field determines which pricing scheme is used for the totals calculation on quotes.
- Internal - The university internal rate is used
- Federal F/A - The university internal rate x the group specified off-campus educational multiplier is used.
- Commercial - The commercial rate for a given item/service is used.
- Recipient Email(s) - The email address/es to which this quote will be emailed when completed. May be multiple emails.
- Description - As short (1-2 paragraph) description of the services to be provided and/or project overview
- Error Block - Any errors with the current quote will be listed here for remediation
- Action Buttons - The available actions for this quote. Note that most actions will be disabled unless the quote is in a ready to send state.
- Save - Saving a quote will save your progress for further editing without sending the quote to the recipient. Saved quotes can be accessed under the "Active Quotes" tab on the quote list. Newly created quotes will be listed as "Creating"
- Send - Sending a quote generates an email with a link to a PDF of the created quoted for approval to the listed recipient emails. Sent quotes will be listed as "Pending" on the "Active Quotes" list.
- Cancel - Cancel any edits on this quote if editing, close and discard if creating.
- Save - Saving a quote will save your progress for further editing without sending the quote to the recipient. Saved quotes can be accessed under the "Active Quotes" tab on the quote list. Newly created quotes will be listed as "Creating"
- Quote Lines Block
- Quote Line List
- Description - The description of the item to be added
- Quantity Field - The number of items described by this line
- Rate Field - The amount to charge per item
- Remove Button
- Add Line Block
- Description - The description of the item to be added
- Quantity Field - The number of items described by this line
- Rate Field - The amount to charge per item
- Add Button - Note: Empty fields may be added to the quotes list
- Quote Line List
- Sales Tax Block (Commercial Recipients Only) - This optional block contains a way to attach an estimate of the sales tax for the listed items above. Clicking the green button will auto-fill the Sales Tax field with a percentage calculation of the sum of the items in the Quote Line List. The Sales Tax field can be overridden manually.
- Available Services / Presets Block - This block contains a list of all services available from the selected group. Available service rates can be selected to auto-populate a new line with the rate description and cost. The displayed rates will be either the internal or commercial rates based on which Recipient Type is selected above. Clicking on a specific rate will add that rate as a new line item.


Managing Existing Quotes
Quote States
Quotes may be in one of 6 states:
- Creating - All unsent quotes in the process of being built.
- Pending - A quote that has been emailed to the user and is awaiting their review and approval/rejection.
- Approved - A quote that has been accepted by the end user. May have comments from the end user
- Rejected - A quote that has been accepted by the end user. Should have comments from the end user regarding why the quote was rejected.
- Accepted - A quote that has been approved by the end user AND accepted by the facility
- Archived - All quotes that are no-longer active in the system. Generally accepted quotes are moved to "archived" after work has begun.


Deleting/Archiving Quotes
Creating and Pending quotes may be deleted at any time. Approved, Rejected, and Accepted quotes will be marked as archived instead of being deleted outright.


Accepting Quotes
An approved quote may be marked as accepted by clicking the "Accept Quote" button. Pending quotes may not be "force approved"

Previewing Quotes
Any quote that has been saved at least once may be previewed by clicking on the "View Quote PDF" button. This will open a PDF of the quote in question in a new tab for review.

Managers are encouraged to "Save" a quote and preview it prior to sending to ensure all appears as intended.
Duplicating Quotes
Any quote that has been saved at least once may be duplicated into a new quote. This is most often used to issue a new quote after a rejection since any quote no-longer in the "Creating" state cannot be edited.

Module Overview
External users often have a need for a PDF quote for services prior to starting a project. Using the "Quotes" module managers can create and send PDF quotes to users for approval.
Workflow
- Managers create a new quote using the Quote Wizard in the Quotes module
- Once created quotes may either be saved in a "Creating" state or immediately sent to the end user for approval
- Quotes that have been sent to end users are saved in the "Pending" state. Pending quotes are editable but updates will not be immediately sent to end users for approval. After updating a pending quote the quote should be sent to the user again.
- Users will receive an email notification when a quote is ready for approval. Any user who receives the notification email will be able to sign off on the quote or reject it. Multiple user emails can be listed.
- Users can click on a link in the notification email to access the Quote review screen. After reviewing the quote on this screen the user is prompted to provide their Full Name and either approve or reject the quote.
- Once a quote is approved or rejected the manager who created the quote initially will receive a notification email regarding the approval/rejection.
- Approved or rejected quotes can be archived for future reference.
Managers can clone previous quotes for convenience. When creating new quotes a full list of services for facilities that they control is available to select from in addition to freeform line entry.
All quotes have 2 notes sections for freeform comments/text relevant to the quote that do not appear on the quote PDF itself. These notes can be used/edited until the quote is archived.
Quotes are marked as estimates for since very often project changes will occur. Provided quotes are not meant to represent commitments to specific pricing or services.
Quote Process Flow
Quotes will generally follow the process below:
- Creation - A quote is generated by the facility and emailed to the recipient.
- Approval - After creation the quote is email to the recipients for approval
- Recipients will receive an email with a PDF of the quote and a link to submit their approval. Approval is performed by entering their full name, any comments, and then clicking the approve or reject buttons.
- Review + Acceptance - Approved or Rejected quotes are then reviewed by the facility for acceptance. The facility contact email(s) will receive a notification email when a quote is approved or rejected.
- Archiving - Post-Acceptance the facility may mark a quote as archived to remove it from the active quotes list. Usually this occurs after work has either begun or is completed on a given quote/project.