Cell Imaging User Training Manual
- Booking Calendar Users Guide
- Policies
- Locations
- Instrument Types
- Instrument Details
- Zeiss 700 Confocal Microscope
- Prairie Ultima 2
- Nikon A1R Confocal
- Evos Auto Color and Fluor Microscope
- Zeiss Axio Scan.Z1
- Nikon Automated Widefield Microscope
- Leica SP8 White Light System
- Leica SP8 405-488-561-633 Laser Confocal
- Zeiss Axioscan 7
- Zeiss 880 Airy Scan
- StedyCon
- Olympus FV1000 Confocal Microscope
- Delta Vision Widefield
- Leica Spinning Disk Confocal
- Nikon Ring TIRF or Spinning Disk Confocal
- Image Analysis Software
- First Steps - Training Procedure
Booking Calendar Users Guide
-
Fill out and submit a Work Authorization form. Work Auth Form For questions about this process please contact the administrative office.
-
All users must complete the online Laser Safety Training provided by
EHS: https://utah.bridgeapp.com/learner/courses/2d8ad69f/enroll. Upon completion,
email your certificate to support.cellimaging@cores.utah.edu
-
We recommend an initial half hour project consultation with Xiang or Anton. This will
help us ensure you obtain the best images possible from your samples. This can be
arranged with the booking calendar. Instructions below.
-
We require 1-2 hours of microscope training prior to solo use of the
microscopes. Please schedule time with both the microscope you want to use and
Xiang or Anton. This can be arranged with the booking calendar. Instructions below.
-
We suggest that you book time with staff for the start of your first imaging session. We
also suggest that you not book after hours imaging until you feel comfortable with the
microscope.
-
If you want assisted imaging instead of training, this should be booked like a training
session, i.e., book both the microscope and staff.
-
Booking Consultation or Training
-
Each Staff member and microscope has a calendar that shows availability that you may
book time for your use. Note that our staff have normal consultation hours at HCI, CSC
and HSC. For any questions regarding our calendar system please email us
-
After booking staff member’s time, check the drop down option next to ‘Process’ to
select the training location. In the ‘Description’ or ‘Service Needed’, please include
information about your imaging needs (e.g., consultation, live cell imaging or SP8
Training).
-
For training or assisted imaging, also book simultaneous time on the microscope.
-
-
Booking a Microscope
-
Book time with both the staff member and suggested microscope simultaneously for
initial hardware and software training.
-
Once trained, use the calendar to book time to use the microscope. Please note the
cancelation policy below.
-
-
Building access is granted after full training is complete
- HCI
-
Computer and building access forms will be provided
-
Submit forms per our instructions
-
-
HSC and CSC
-
You must then go in person with your UID card to our Administrative Office to gain card
access to the building and rooms to which you have been granted permissions. To get
to our Administrative Office (Skaggs Bldg 582, Room 250), enter from the South doors,
go up the stairs to the second floor, the offices are straight down the hall.
-
- SMBB
-
We will send your information to the SMBB building office.•
-
- HCI
If you have any more questions concerning this process please contact us at support.cellimaging@cores.utah.edu.
Calendar bookings must be deleted by the user 12 hours prior to the time reserved in order to avoid billing charges. The booking time cannot be altered or deleted after this point and is non-refundable nor creditable if this time window is not met. The Cell Imaging Core is not liable if a user no longer needs their booking, if a user’s samples do not work, if a user cannot make their booking, etc. However, if an instrument is down, is offline, or is under maintenance all fees will be voided for that duration.
Users with overages or caught with unregistered time can be charged $100/h.
Policies
The rules for using the Cell Imaging Core and for specific instruments.
General Policies
Calendar
It is your responsibility to reserve the time you use. You must report usage variations (overages and cancellations) to Dr. Wang before the end of the month to reconcile charges. In order for your account to work it needs to have a valid chartfield assigned to it and the core office needs to approve. If you get an error about chartfields it means yours has expired or there isn’t a valid chartfield assigned to your account. The core offices (801-581-2425) can reauthorize your account should this occur.
Usage Policies
There are limits to the number of hours a lab or user may reserve at any given time (20 business hours per week total). Exceptions must be arranged with the imaging core committee. Users who need after hours access need to contact the Cell Imaging Team about access and sign a security form in the main office RM 5C124 of the School of Medicine.
Imaging Core Advisory Committee
The committee was established July 2011 and meets about every other month to discuss various issues including upgrades to equipment, problems with equipment, allocating confocal time to large scan projects requiring >24 hour scans and service priorities for the future. The most recent meeting date is listed in the news section for the core.
Enforcement/Compliance
Users will be notified by Dr. Wang when they have violated posted core policies (oil on objectives, disregarding requests, logbook issues, not reserving time etc.) via email. The first offense they will receive email warning cc’d to the PI with a suggested remedy and a notice of the penalty schedule. Notice of the second offense will be sent by the oversight committee and copied to the PI with an invoice for a $250.00 penalty. The third notice will result in a $1000 penalty with review by the oversight committee for blocking future usage privileges. Users found without reservations will be charged the full rate plus be put on the list for a $250 fine for the second notice.
After Hours Usage
The new policy on after hours usage requires users to sign up for time in advance. Incidents of unregistered usage will be charged to the PI at $100/hr. No property of the core facility may leave the building without prior approval from core staff even for short experiments. If there is a problem in the facility after hours please contact the Cell Imaging Team.
Data Storage Issues
Our current data storage policy has been adopted to ensure that enough free space is available on hard drives for capture of new data. The Cell Imaging core is not responsible for storing your data. We actively delete data that is more than 90 days old. We are not responsible for data lost due to hard drive failures even within the 90 day period following creation dates. Acquisition instruments are not on the network to preserve security and reduce interference with the instruments. If you need a better data transfer solution please contact the staff for advice rather than leaving your only copy of data at the facility.
Locations
Maps to the microscopes! The Cell Imaging Core maintains microscopes in several buildings across campus.
HSC Core Research Facility
Building: 585
Code HS CORE
Map: https://cores.utah.edu/wp-content/uploads/2023/11/CellImaging-HSC-585.pdf
- Axio Scan.Z1
- Zeiss 700 (Details)
- Nikon A1R
- NanoString CosMx
- HSC Workstation
- Pairie Multi-Photon
- Pairie Ultima 2 Photon
- Cell Imaging Offices
HCI - Cancer Research North
Building: 555
Code: HCI North
Map: https://cores.utah.edu/wp-content/uploads/2023/11/CellImaging-HCI-555.pdf
- Axioscan 7
- Leica SP8 White Light
- Leica SP8 405-488-561-633
- Nikon Automated Widefield
- Cell Imaging HCI Office
Jones Medical Research
Building: 565
Code: EEJMRB
Map: https://cores.utah.edu/wp-content/uploads/2023/11/CellImaging-EEJ-565.pdf
- Leica Spinning Disk
- Delta Vision Widefield
- Nikon Ring TIRF/Spinning Disk
Crocker Science Center
Building: 5
Code: CSC
Map: https://cores.utah.edu/wp-content/uploads/2023/11/CellImaging-CSC-5.pdf
- Zeiss 880 Airy Scan
- StedyCon
- Olympus FV1000
- Cell Imaging CSC Office
ASB - Skaggs Biology Building
Building: 82
Code: ASB
Map: https://cores.utah.edu/wp-content/uploads/2023/11/CellImaging-ASB-82.pdf
- Leica Cryostat
- Vutara Super Resolution
Skaggs Hall
Building: 582
Code: SK H
Map: https://cores.utah.edu/wp-content/uploads/2023/11/CoresAdmin-582.pdf
- Cores Administration Office, Room 250
Instrument Types
Different microscopes have different uses.
Wide Field Microscope
Wide field microscopes illuminate the whole field of view at one time. Imaging is fast, but out of plane information is included as blur. There are computational methods that can reduce, but not eliminate the blur (e.g., deconvolution and extended depth of focus).
The Cell Imaging Core has wide field imaging systems. These include:
- EVOS Auto Color and Fluor
- Nikon Automated Widefield
- DeltaVision Widefield
- Axio Scan.Z1 Slide scanner (details)
- Axioscan 7 Slide scanner
Confocal Microscope
Laser Scanning Confocal
A scanning confocal illuminates one spot at a time and scans across the field of view. There is also a pinhole to limit out of focal plane blur. The result is a sharper image. Further, they can be used to image the sample in 3 dimensions. This does come at the expense of a much longer imaging time than wide field.
- Zeiss 700 Confocal (details)
- Nikon A1R Confocal
- Leica SP8 Confocal
- Zeiss 880 Airy Scan
- Olympus FV1000
Spinning Disk Confocal
A spinning disk confocal uses several pinholes to gather data from multiple spots at one time. Like a wide field, the spinning disk confocal uses a camera instead of a single point detector. These two changes greatly reduce the imaging time, making them suitable for live cell imaging.
- Leica Spinning Disk
- Nikon Ring TIRF or Spinning Disk Confocal
Multi-Photon
2-photon/multi-photon microscopes rely on 2 or more simultaneous lower energy photons to stimulate fluorescence. One of the main advantages of this method is that the lasers can penetrate deeper into the sample. It does require a more powerful laser and working in the IR. Applications include samples up to a few mm thick and intravital microscopy.
- Prairie Multi-Photon Confocal
- Prairie Ultima InVivo 2 Photon GaSP
Super Resolution
Resolution in microscopy is diffraction limited to roughly half the wavelength of the light being detected. Super resolution methods use additional information to break through the diffraction limit. This can be extra spatial or temporal information and may require additional data collection as well as additional computation to generate the high resolution image.
Airy Scan
In an Airy scan microscope, multiple detectors are used to interrogate the spatial blur or Airy pattern. This additional information is then used to reduce the blur, achieving higher resolution than normal confocal.
- Zeiss 880 Airy Scan
STED
STimulated Emission Depletion uses a laser to deplete emission around the focal spot. This provides much higher lateral resolution. This is one of a few super-resolution microscopy methods.
- StedyCon
Structured Light
If several images are made with known patterns of light, the images can be combined to create a higher resolution image.
The Nikon Spinning Disk uses structured light to in its LiveSR unit.
- Nikon Ring TIRF or Spinning Disk Confocal
TIRF
Total Internal Reflection Fluorescence microscopy achieves thin Z sectioning at the expense of only being able to image the first thin (<200nm) layer of the sample. It does have a high signal to noise ratio because there is very little out of plane fluorescence. This makes the method useful for for events in cellular surfaces.
- Nikon Ring TIRF or Spinning Disk Confocal
Instrument Details
Details about each instrument
Zeiss 700 Confocal Microscope
Location: HSC (Building 586) Room 56
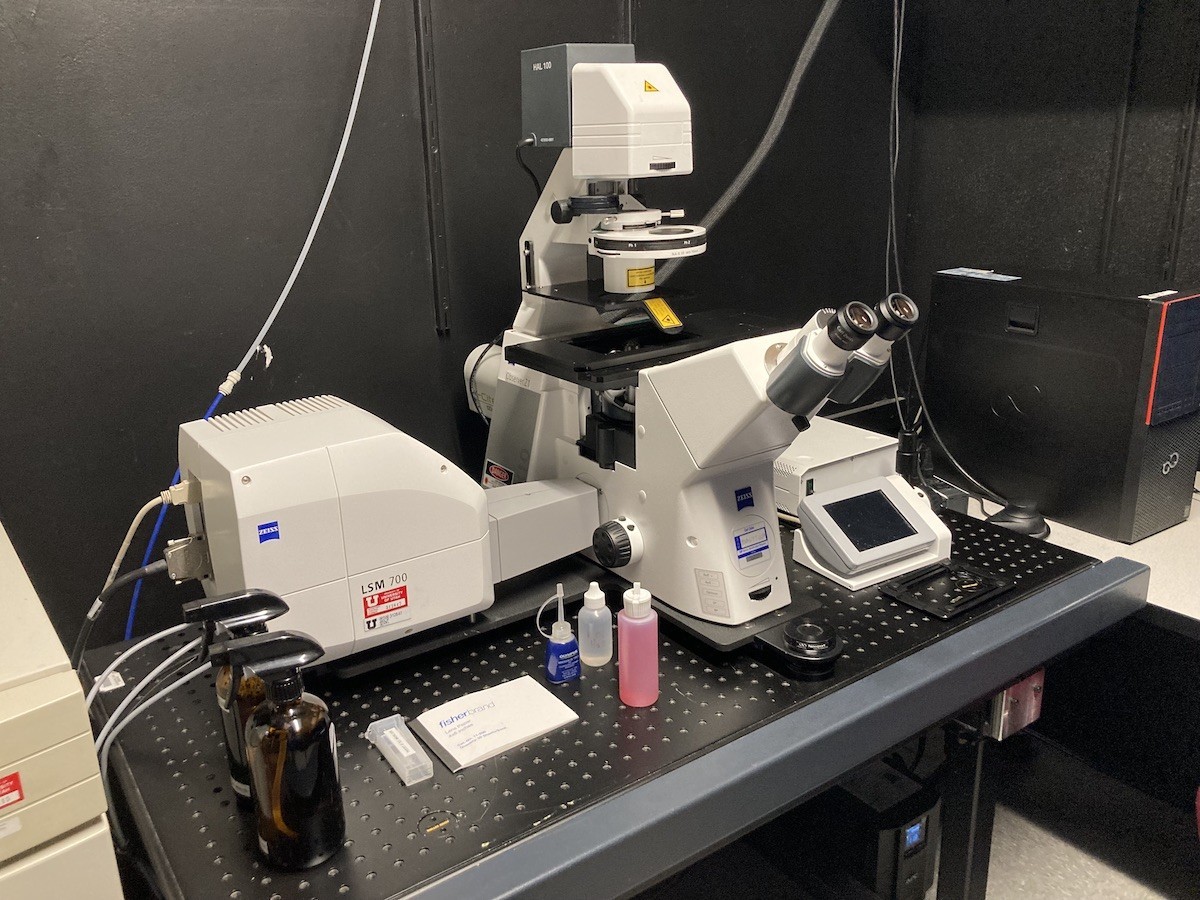
The LSM 700 laser scanning confocal microscope is the seventh generation of confocal microscopes from Carl Zeiss. The LSM 700 system uses a Zeiss AXIO Observer Z1 inverted microscope with transmitted illumination (HAL 100) and a laser illumination source. The LSM 700 system features easy operation, excellent sensitivity, and a design that can handle complex tasks.
Main features of Zeiss 700 System:
- Two Photo Multipliers Tube (PMT1 and PMT2) detector unit enables simultaneous 12 bit (4096 intensity levels) acquisition of up to 4 fluorescent channels.
- Confocal scan head unit can provide high-resolution images up to 2048 x 2048 pixels in size.
- Fully automated Zeiss Observer Z1 inverted microscope.
- LED Epifluorescence and HAL100 Brightfield illumination lamps for rapid sample identification and focusing through the eyepiece.
- Filter wheel used for epifluorescence viewing of the sample is currently outfitted with DAPI , FITC (green), and Rhodamine (red) filter cube sets.
- Motorized XY stage with a variety of stage inserts available (slides, dishes, multiwall plates, etc..).
- Zeiss Zen Black multi-platform acquisition software.
- Measurements include: Z stack, Time lapse, Stitching/Tiling, XY positions, and Spectra unmixing
Suggested Applications:
-
3D Imaging.
- Multichannel fluorescence fixed slide imaging.
- Tiled mosaics.
Imaging lasers:
| Wavelength (nm) | Type | Power | Manufacturer |
| 405 | diode | 5 mW |
Lasos Lasertechnik GmbH |
| 488 | diode | 10 mW |
Lasos Lasertechnik GmbH |
| 555 | diode | 10 mW |
Lasos Lasertechnik GmbH |
| 639 | diode | 5 mW |
Lasos Lasertechnik GmbH |
Objectives:
| Objective | Magnification | Immersion |
Numerical Apperature |
Correction Ring | Coverglass (mm) |
Working Distance (mm) |
| EC Plan Neofluar M27 | 10X | Air | 0.3 | 0.17 |
5.2 |
|
| Pan Apo M27 | 20X | Air | 0.8 | 0.17 | 0.55 | |
| LD C-Apo Korr M27 | 40X | Water | 1.1 | Corr | 0.14-0.19 | 0.62 |
| Pan Apo DIC M27 | 63X | Oil | 1.4 | 0.17 | 0.19 |
Prairie Ultima 2
Location: HSC Room 48B / 48D
Main features of Prairie Ultima 2/Multi-Photon Confocal System:
- Six detectors, four reflected mode Photo Multipliers Tube (PMT) detectors and two transmitted mode PMTs for second harmonic and fluorescence detection.
- High NA water immersion optics including 16x PLANAPO LWD Nikon NA 0.8 and a PLANAPO Correction collar LWD 25x NA 1.1, 60x LUMFL water immersion Olympus NA0.8.
- Resonance scanner for high speed imaging timelapse (~200fps depending on format)
- Piezo Z drive for fast z acquisition, 2 inch travel, XY motorized stage
- Fixed (Z) stage with adjustable (2 inch) travel
- Bioscience Tools stage top incubator with heated pad, heated dish
- Mouse Anesthesia system from VetEquip for in vivo applications (Halothane with scrubber)
- Gas supply, 02, C02, 02/C02 mix
Imaging lasers:
- Coherent Vision II with tuning 705-1060nm pulsed femtosecond range 4000-400mW depending on wavelength
Suggested Applications:
- Deep live cell imaging of zebrafish, mouse in vivo, organ culture and slices, 3D cell culture
- Multichannel fluorescence in vivo, slices or cultures
- Tiling mosaics of fixed or live samples
- Timelapse of whole mount, in vivo mouse, culture
- Second harmonic imaging of collagen or other ECM
Objectives:
48B:
| Objective | Magnification | Immersion | Numerical Aperture | Correction Collar | Coverslip (mm) | Working Distance (mm) |
| Apo | 25 | Water, Water Dipping | 1.1 | Corr | 0-0.17 | 2 |
48D:
| Objective | Magnification | Immersion | Numerical Aperture | Correction Collar | Coverslip (mm) | Working Distance (mm) |
| Plan Apo Lambda | 4 | Air | 0.2 |
20 |
||
| Plan Fluor | 10 | Air | 0.3 | 0.17 |
16 |
|
| UPlanFl | 10 | Air | 0.3 |
|
||
| LWD | 16 | Water Dipping | 0.8 | 0 |
3 |
|
| Apo | 25 | Water, Water Dipping | 1.1 | Corr | 0-0.17 |
2 |
| Fluor | 40 | Water Dipping | 0.8 | 0 |
2 |
Nikon A1R Confocal
Location: HSC Room 56
Main features of System:
- Four Photo Multipliers Tube (PMT) detector unit enables simultaneous 12 bit (4096 intensity levels) acquisition of up to 4 fluorescent channels.
- Fifth transmitted light detector available for simultaneous brightfield imaging of samples while scanning confocally.
- Hybrid confocal scan head unit can provide high resolution images up to 4096 x 4096 pixels in size in conventional galvonometer mode and in high speed resonant mode up to 30 frames per second at 512 x 512 pixels.
- Ultra high speed resonant acquisitions up to 420 frames per second at 512 x 32 pixels.
- Fully automated Nikon Ti-E inverted microscope.
- Epifluorescence and DIC (Nomarski) illumination lamps for rapid sample identification and focusing.
- Filter wheel used for epifluorescence viewing of sample is currently outfitted with with DAPI (blue), FITC (green), and TRITC (red), filter cube sets.
- ASI MS-2000 Motorized XY stage with a variety of stage inserts available (slides,dishes, multiwall plates, etc..).
- MCL Piezo Stage (100um range) for high speed 3D (i.e., Z-stack) volume acquisition.
- Perfect Focus System provides focal depth consistency across varying sample regions of interest.
- Nikon NIS-Elements multi-platform acquisition software.
Imaging lasers:
- 405nm diode laser
- 488nm Argon gas laser
- 561nm Sapphire diode laser
- 638nm diode laser
Suggested Applications:
- Multichannel fluorescence and transmitted fixed slide imaging
- Tiling mosaics of fixed or live samples
- Timelapse of dishes or glass bottom well plates
Objectives:
| Objective | Magnification | Immersion | Numerical Aperture | Correction Ring | Coverglass | Working Distance |
| Plan Apo Lambda | 4 | Air | 0.2 | 20 | ||
| Plan Apo Lambda | 10 | Air | 0.45 | 0.17 | 4 | |
| Plan Apo Lambda | 20 | Air | 0.75 | 0.17 | 1 | |
| Plan Fluor | 40 | Oil | 1.3 | 0.17 | 0.2 | |
| Plan Apo Lambda | 60 | Oil | 1.4 | 0.17 | 0.13 |
Other objectives available. Please inquire with Core personnel
Evos Auto Color and Fluor Microscope
Location: HSC (Building 586) Room 54
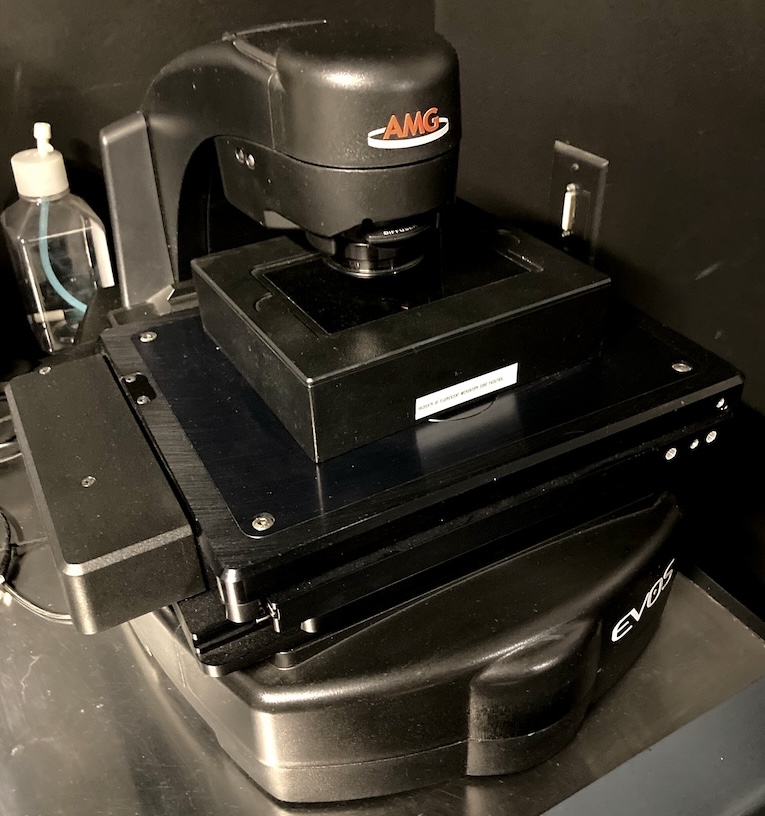
The EVOS FL Imaging system is an all-in-one fluorescence microscope designed for efficiency and ease of use. The on-board computer and integrated imaging software allows users to capture and save four channels fluorescence images/data directly from the microscope. The EVOS FL Imaging System is suitable for checking samples before using a high-end microscope system.
Main features of System:
- Dual 16-bit CCD acquisition cameras (Monochromatic and Color)
- 22” high-resolution touch screen color monitor
- Automated X-Y scanning stage with interchangable specimen holder inserts. We have available inserts for glass slides, culture dishes, multiwell plates, and T-flasks
- EVOS LED Light Cube Technology. We have following cubes available:
DAPI, GFP, RFP, Texas Red, and Cy5
Suggested Applications:
-
Fixed and live cell imaging.
- Tissue imaging.
- Sample check before using a high-end microscope system.
Light Sources:
LED light cubes which combine bright LED illumination with excitation and emission filters. DAPI, CY5, GFP, RFP and Texas Red cubes are available. Four can be installed at one time. Contact Cell Imaging staff to change cubes if needed. A selection guide for matching cubes to dyes is on the ThermoFisher site: Guide
| Cube | Excitation (nm) | Emission (nm) |
| DAPI | 357/44 | 447/60 |
| GFP | 485/25 | 524/24 |
| RFP | 531/40 | 593/40 |
| Texas Red | 585/29 | 628/32 |
| Cy5 | 628/40 | 692/40 |
Objectives:
The objectives on the Evos are Long Working Distance, not Coverslip-Corrected. They are optimized for use through vessels with a nominal wall thickness of 0.9-1.5 mm.
| Objective | Magnification | Immersion |
Numerical Apperature |
Correction Ring | Coverglass (mm) |
Working Distance (mm) |
| PlanApo | 1.25X | Air | 0.04 |
5.10 |
||
| Plan Fluor | 4X | Air | 0.13 |
17.2 |
||
| Plan Fluor | 10X | Air | 0.3 | 1.2 | 8.31 | |
| Plan Fluor | 20X | Air | 0.45 | 1.2 | 7.11 | |
| Plan Fluor | 40X | Air | 0.65 | 1.2 | 2.81 |
Zeiss Axio Scan.Z1
Location: HSC (Building 586) Room 60
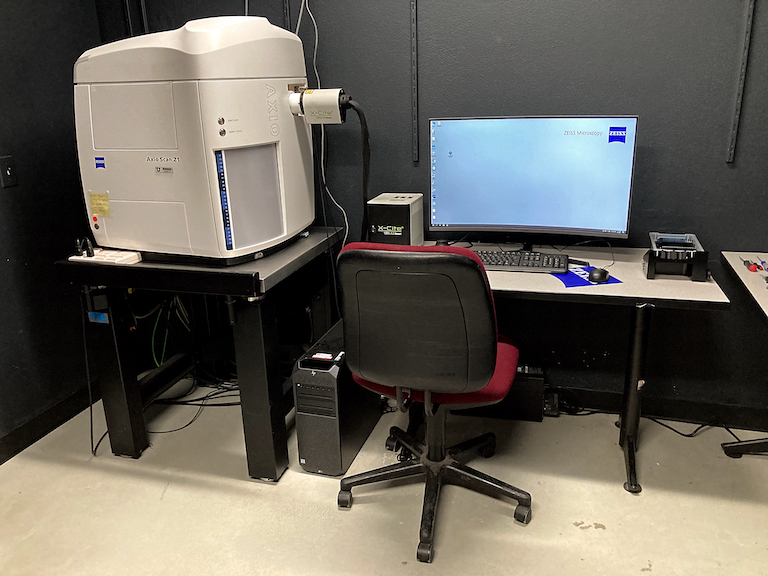
The Zeiss Axio-Scan.Z1 is a fast and flexible slide scanner that digitizes specimens to produce high-quality virtual slides. In addition to brightfield slide scanning, the Axio-Scan.Z1 uses LED lights to scan up to nine fluorescent channels. Up to 100 slides can be loaded onto the scanner, making it suitable for large projects, including digital archives. Scanned images are saved as CZI files and can be viewed using Zeiss freeware Zen-lite or third-party image analysis programs.
Main features of Axio Scan.Z1:
- Holds up to 100 slides.
- Able to image both bright-field (e.g. H&E slides) and up to nine-colour fluorescent samples.
- Image areas can be detected automatically or marked out, to form montages of the whole sample, or multiple samples on each slide
- Setup wizard to guide users through optimising image acquisition and autofocus parameters.
- Once setup, the system can be left for unattended automated scanning e.g. overnight
Light Sources:
In addition to an internal lamp for brightfield imaging, the Axio Scan.Z1 has an X-Cite 120LED source for fluorescent imaging.
Filter cubes for LEDs:
The scanner has a 10 position filter turret to fit most fluorophores. The Zen profile wizard is used to pick filter to match your imaging needs. Alternate filter cubes can be installed for specialty applications. Please consult with Cell Imaging staff for consultation and assistance.
| Filter Position | Excitation (nm) | Emission (nm) | Typical Fluorophores | Opal Dye |
| 1 | empty | empty | Brightfield | |
| 2 | 325-375 | 435-485 | DAPI | |
| 3 | 426-446 | 465-495 | Cyan, Protein | 480 |
| 4 | 480-500 | 510-530 | Alexa Fluor 488 | 520 |
| 5 | 510-530 | 540-560 | Alexa Fluor 489 | 540 |
| 6 | 538-562 | 570-640 | HE, DsRed, Alexa Fluor 555 | 570 |
| 7 | 568-592 | 610-640 | Alexa Fluor 568 | 620 |
| 8 | 610-630 | 645-675 | Alexa Fluor 660 | 650 |
| 9 | 625-655 | 666-715 | Cy5 | |
| 10 | 650-680 | 695-755 | Alexa Fluor 680 | 690 |
Objectives:
| Objective | Magnification | Immersion |
Numerical Apperature |
Correction Ring | Coverglass (mm) |
Working Distance (mm) |
| EC Plan-Neofluar M27 | 2.5X | Air |
0.085 |
0.17 |
8.8 |
|
| Fluor M27 | 2.5X | Air |
0.12 |
0.17 |
8.7 |
|
| Fluar M27 | 5X | Air | 0.25 | 0.17 |
12.5 |
|
| Plan Apo M27 | 10X | Air | 0.45 | 0.17 |
2.1 |
|
| Plan Apo M27 | 20X | Air | 0.8 | 0.17 | 0.55 | |
| Plan Apo Korr M27 | 40X | Air | 0.95 | 0.13-0.21 | 0.25 |
Nikon Automated Widefield Microscope
Location: HCI Room 1430
Main features of System:
- Widefield light pathway employs a high sensitivity Andor Zyla CMOS camera
- Sola automated LED lightsource for both widefield fluorescence and transmitted illumination pathways
- Fully automated Nikon Ti-E inverted microscope
- Perfect Focus System provides focal depth consistency across varying sample regions of interest
- Motorized Prior II XY stage with a variety of stage inserts available (slides,dishes, multiwall plates, etc..)
- Nikon NIS-Elements multi-platform acquisition software capable of Tiling, timelapse, scripting, analysis and advanced image processing.
- Stage Incubator: OKOLAB, C02 and Humidity with either dish or plate adaptor
Suggested Applications:
- Multichannel fluorescence and transmitted fixed slide imaging
- Tiling mosaics of fixed or live samples
- Timelapse of dishes or glass bottom well plates
Objectives:
| Objective | Magnification | Immersion | Numerical Aperture | Correction Ring | Coverglass (mm) | Working Distance (mm) |
| Plan Apo Lambda | 4 | Air | 0.2 | 20 | ||
| Plan Apo Lambda | 10 | Air | 0.45 |
0.17 |
4 | |
| Plan Apo Lambda | 20 | Air | 0.75 | 0.17 | 1 | |
| S PLAN Fluor ADM ELWD | 20 | Air | 0.45 | Corr | 0-2.0 | 8.2-6.9 |
| Plan Apo Lambda | 60 | Oil | 1.4 | 0.17 | 0.13 | |
| Plan Apo Lambda | 100 | Oil | 1.45 | 0.17 | 0.13 |
Other objectives available. Please inquire with Core personnel
Leica SP8 White Light System
Location: HCI Room 1480
Main features of Leica SP8 White Light System:
- Five detectors, Two Photo Multipliers Tube (PMT) detectors and three HyD detectors for enhanced sensitivity and dynamic range for 5 total fluorescent channels.
- Transmitted light detector available for simultaneous brightfield imaging of samples while scanning confocally.
- Hybrid confocal scan head unit can provide high resolution images up to 4096 x 4096 pixels in size in conventional galvonometer mode and in high speed resonant mode up to 30 frames per second at 512 x 512 pixels.
- Ultra high speed resonant acquisitions up to 420 frames per second at 512 x 32 pixels.
- Fully automated Leica DM8 microscope
- Epifluorescence and DIC (Nomarski) illumination lamps for rapid sample identification and focusing.
- Filter wheel used for epifluorescence viewing of sample is currently outfitted with with DAPI (blue), FITC (green), and TRITC (red), filter cube sets.
- Laser autofocus system provides focal depth consistency across varying sample regions of interest.
- OkoLab heating/cooling stage top incubator with C02 and humidity. Plates and dishes with glass bottoms.
Imaging lasers:
- 405nm diode laser
- 488nm Argon gas laser
- White Light continuously tunable pulsed laser 440-700nm
Suggested Applications:
- Multichannel fluorescence and transmitted fixed slide imaging
- Tiling mosaics of fixed or live samples
- Timelapse of dishes or glass bottom well plates
Objectives:
| Objective | Magnification | Immersion | Numerical Aperture | Correction Ring | Coverglass (mm) | Working Distance (mm) |
| HC PL APO CS2 | 10 | Air | 0.4 | 2.74 | ||
| HC PL APO CS2 | 20 | Either water, glycerine, or oil | 0.75 | Corr | 0.66 | |
| HC PL APO CS2 | 20 | Air | 0.75 | 0.17 | 0.62 | |
| HC PL APO CS2 | 40 | Water | 1.1 | Corr | 0.14-0.18 | 0.65 |
| HC PL APO CS2 | 40 | Oil | 1.3 | 0.17 | 0.24 | |
| HC PL APO CS2 | 60 | Oil | 1.4 | 0.17 | 0.14 |
Other objectives available. Please inquire with Core personnel
Leica SP8 405-488-561-633 Laser Confocal
Location: HCI Room 1440
Main features of Leica SP8 White Light System:
- Five detectors, Two Photo Multipliers Tube (PMT) detectors and three HyD detectors for enhanced sensitivity and dynamic range for 5 total fluorescent channels.
- Transmitted light detector available for simultaneous brightfield imaging of samples while scanning confocally.
- Hybrid confocal scan head unit can provide high resolution images up to 4096 x 4096 pixels in size in conventional galvonometer mode and in high speed resonant mode up to 30 frames per second at 512 x 512 pixels.
- Ultra high speed resonant acquisitions up to 420 frames per second at 512 x 32 pixels.
- Fully automated Leica DM8 microscope
- Epifluorescence and DIC (Nomarski) illumination lamps for rapid sample identification and focusing.
- Filter wheel used for epifluorescence viewing of sample is currently outfitted with with DAPI (blue), FITC (green), and TRITC (red), filter cube sets.
- Laser autofocus system provides focal depth consistency across varying sample regions of interest.
- OkoLab heating/cooling stage top incubator with C02 and humidity. Plates and dishes with glass bottoms.
- z-galvo
Imaging lasers:
- 405nm diode laser
- 488nm Argon gas laser
- White Light continuously tunable pulsed laser 440-700nm
- 561
- 633
Suggested Applications:
- Multichannel fluorescence and transmitted fixed slide imaging
- Tiling mosaics of fixed or live samples
- Timelapse of dishes or glass bottom well plates
Objectives:
| Objective | Magnification | Immersion | Numerical Aperture | Correction Collar | Coverslip (mm) | Working Distance (mm) |
| HC PL APO CS2 | 10 | Air | 0.4 | 2.74 | ||
| HC PL APO CS2 | 20 | Either water, glycerine, or oil | 0.75 | Corr | 0.66 | |
| HC PL APO CS2 | 20 | Air | 0.75 | 0.17 | 0.62 | |
| HC PL APO CS2 | 40 | Water | 1.1 | Corr | 0.14-0.18 | 0.65 |
| HC PL APO CS2 | 40 | Oil | 1.3 | 0.17 | 0.24 | |
| HC PL APO CS2 | 63 | Oil | 1.4 | 0.17 | 0.14 |
Zeiss Axioscan 7
Location: HCI Room 1470

The Zeiss AxioScan 7 is a fast and flexible slide scanner that digitizes specimens to produce high-quality virtual slides. In addition to brightfield slide scanning, the Axioscan 7 can scan up to five fluorescent channels using fast switching LED lights. Up to 100 slides can be loaded onto the scanner, making it suitable for large projects, including digital archives. Scanned images are saved as CZI files and can be viewed using Zeiss freeware Zen-lite or third-party image analysis programs.
Main Features of the Axioscan 7:
- Holds up to 100 slides.
- Able to image both bright-field (e.g. H&E slides) and up to nine-colour fluorescent samples.
- Image areas can be detected automatically or marked out, to form montages of the whole sample, or multiple samples on each slide
- Setup wizard to guide users through optimising image acquisition and autofocus parameters.
- Once setup, the system can be left for unattended automated scanning e.g. overnight
Suggested Applications:
- Fixed slides.
Configurations:
The Axioscan 7 has a replaceable filter turret and can be switched between two light sources. The 10 position filter cube turret is typically used with the Colibri 7 switchable LED source. The fast filter wheel is typically used with the X-Cite Xylis LED source.
| Configuration | Light Source | Filter Set |
| 1 | Colibri 7 | Filter Cubes |
| 2 | X-Cite Xylis | Fast Filter Wheel |
Only Cell Imaging staff are permitted to switch between configurations. Please schedule our time and plan accordingly.
Light Sources:
Colibri 7:
The Colibri 7 has 6 LEDs with excitation filters to provide 7 excitation bands. (One LED has a motorized filter to split it into two bands.)
Excitation Bands (There is one too many here)
| Band | Wavelength / Bandwidth (nm) | Some typical fluorophores |
| UV | 385/30 |
API, Hoechst 33342, Hoechst 33258, Alexa Fluor 350, Alexa Fluor 405, Indo-1, eBFP / BFP, eGFP (wt), True Blue |
| V | 423/44 |
Pacific Blue, Lucifer Yellow, Alexa Fluor 433, eCFP, Cerulean |
| B | 469/38 |
FM1-43, Cy2, eGFP, NBD, MitoTracker Green, Alexa Fluor 488, BCECF, Calcein, DiO SNAFL, YO-Pro-1, Nissl, LysoSensor Green, mHoneydew, FITC / Fluorescein, Kaede (green / red), PerCP, YoYo-1,FuraRed |
| C | 511/44 |
Rhodamine 123, Fluo-4, Oregon Green BAPTA, Sytox Green, eYFP, FM4-64, Eosin/HE, Acridine Orange, JC1, Bodipy FL, Propidium Iodide, Spectrum Green, Calcium Green |
| G | 555/30 |
TRITC, 7-AAD, Cy3, tdTomato, Alexa Fluor 546, Alexa Fluor 555, DsRed, mOrange, TagRFP, SNARF, DyLight 549, Spectrum Orange |
| Y | 590/27 |
MitoTracker RED FM/CMXRos, txRed, mCherry, mRFP1, Cy3.5, Rhodamine B, Alexa Fluor 568, Dylight 594, Alexa Fluor 594, Bodipy TR |
| R | 631/33 |
Alexa Fluor 633, Alexa Fluor 647, Cy5, DRAQ5, ToTo-3, ATTO-655, MitoTracker DeepRed, APC, ATTO-647N |
| FR | 735/40 |
Alexa Fluor 750, Alexa Fluor 790, Cy7, Cy7.5 |
X-Cite Xylis:
The X-Cite Xylis XT720L is a broad spectrum illuminator with a range from 380-770nm. It has peaks at 385, 430, 475, 545, 635, 735nm.
Filters:
Filter Cubes:
In multi-band fluorescence imaging, the filter turret has to move between positions for each band. This is usually done on a per-tile basis. At about 400ms per move, this can add up, especially for a large scan at higher magnification. The Axioscan 7 has 2 multi-band cubes. If these can be used, it can reduce or eliminate these moves and reduce scan time. These can be used on the Axioscan 7 because it has the Colibri 7 switching LED source.
|
Filter No |
Fluorochrome |
Excitation (nm) |
Beamsplitter (nm) |
Emission (nm) |
|
1 |
Empty (Brightfield) |
|
|
|
|
2 |
HE GFP |
450-490 |
495 |
500-550 |
|
3 |
HE DsRed |
538-562 |
570 |
570-640 |
|
4 |
Cy5 |
625-655 |
660 |
665-715 |
|
5 |
HE BFP |
370-410 |
420 |
430-470 |
|
6 |
HE DAPI/GFP/Cy3.5/Cy7 |
375-395 455-483 583-600 720-750 |
405 493 611 762 |
410-440 501-547 618-650 770-800 |
|
7 |
HE DAPI/GFP/Cy3.5/Cy5/Cy7 |
370-400 450-488 540-570 614-647 720-750 |
405 493 575 654 761 |
412-438 501-527 582-601 662-700 770-800 |
|
Pol |
Circular polarizer and analyzer |
|
|
|
|
ND |
6% Neutral Density Filter |
|
|
|
Fast Filter Wheel:
The fast filter wheel moves between filter positions about 10 times faster than the filter cube turret.
Need information here
| Filter | Pass Peak and Width | Typical fluorophores |
| Empty (Brightfield) | ||
| Single Channel 1 | ||
| Single Channel 2 | ||
| Single Channel 3 | ||
| Dual Channel 4 | ||
| Dual Channel 5 |
Objectives:
| Objective | Magnification | Immersion |
Numerical Apperature |
Correction Ring | Coverglass (mm) |
Working Distance (mm) |
| Fluar M27 | 5X | Air | 0.25 | 0.17 |
12.5 |
|
| Pan Apo M27 | 10X | Air | 0.45 | 0.17 | 2.1 | |
| Pan Apo M27 | 20X | Air | 0.8 | 0.17 | 0.55 | |
| Pan Apo Korr M27 | 40X | Air | 0.95 | 0.13-0.21 | 0.25 | |
| EC Pan-Neofluar Pol M27 | 20X | Air | 0.5 | 0.17 | 2 |
Zeiss 880 Airy Scan
Location:CSC Room 032

Main features of Zeiss 880 Airy Scan System:
- Five detectors, Three Photo Multipliers Tube (PMT) detectors and two GaSP detectors for enhanced sensitivity and dynamic range for 5 total fluorescent channels.
- Transmitted light detector available for simultaneous brightfield imaging of samples while scanning confocally.
- AIRY scan detector capable of super resolution imaging
- Fast AIRY scan system for high speed super resolution imaging timelapse
- Epifluorescence and DIC (Nomarski) illumination lamps for rapid sample identification and focusing.
- Filter wheel used for epifluorescence viewing of sample is currently outfitted with with DAPI (blue), FITC (green), and TRITC (red), filter cube sets.
- Laser autofocus system provides focal depth consistency across varying sample regions of interest.
- Piezo Z stage for fast z acquisition
- IBIDI stage top incubator with temperature, C02 and humidity. Plates and dishes with glass bottoms.
Imaging lasers:
- 405nm diode laser
- 488nm Argon gas laser
- 561nm diode
- 638nm diode
Suggested Applications:
- Multichannel fluorescence and transmitted fixed slide imaging
- Tiling mosaics of fixed or live samples
- Timelapse of dishes or glass bottom well plates
Objectives:
|
Objective |
Magnification | Immersion | Numerical Apperature | Correction Ring | Coverglass (mm) | Working Distance (mm) |
| Plan Apo M27 | 5 | Air | 0.16 | 0.17 | 12.1 | |
| EC Plan-Neofluar M27 | 10 | Air | 0.3 | 0.17 | 5.2 | |
| Plan Apo M27 | 20 | Air | 0.8 | 0.17 | 0.55 | |
| Plan Apo M27 | 40 | Oil | 1.3 | 0.17 | 0.21 | |
| Plan Apo DIC M27 | 63 | Oil | 1.4 | 0.17 | 0.19 | |
| Calibration Apo DIC M27 |
StedyCon
Location: CSC Room 30
Main features of StedyCon:
- STEDYCON from Abberior is a new class of nanoscope with multicolor confocal and STED (Stimulated emission depletion) capabilities. The lateral STED resolution could reach 30nm depending on dyes and objectives used. The acquired STEDYCON system is fitted on a Nikon Ti-S-E inverted microscope from a camera port and equipped with four excitation lasers: 405 nm CW and 488, 561, 640 nm pulse laser.
- The STED process is applied by a 775 nm pulse laser. Four highly sensitive single-photon-counting Avalanche photodiode detectors (APD) are mounted.
- Two STED and four confocal imaging channels can be detected. A 100X/NA=1.45 oil immersion lens and other low magnification lens are provided to satisfy versatile measurements.
- An XY stage from Marzhauser and an ultra-fast and precise Piezo Z stage from PIFOC are mounted. Browser-based acquisition software is installed on a powerful PC with a Windows 10 system.
- Other advanced functions including Z stack, multipositioning, time series, and tiling and stitching can be performed.
Objectives:
| Objective | Magnification | Immersion | Numerical Apperature | Correction Ring | Coverglass (mm) | Working Distance (mm) |
| Plan Apo Lambda | 4X | Air | 0.2 | 20 | ||
| Okan-Neofluar | 5X | Air | 0.15 | 0.17 | 13.6 | |
| Plan Apo | 10X | Air | 0.45 | 0.17 | 4 | |
| PlanApo Lambda | 20X | Air | 0.75 | 0.17 | 1 | |
| Plan Apo Lambda | 60X | Oil | 1.4 | 0.17 | 0.13 | |
| Plan Apo Lambda | 100x | Oil | 1.45 | 0.17 | 0.13 |
Olympus FV1000 Confocal Microscope
Location: CSC Room 32
Main features of System:
- Three standard Photo Multipliers Tube (PMT) light detectors with two of the channels having tunable spectral bandwidths.
- Simultaneous transmitted light or DIC imaging while scanning confocally.
- Fully automated Olympus IX81 inverted microscope.
- Additional epifluorescence and DIC (Nomarski) illumination lamps for rapid sample identification and focusing.
- Motorized Prior II XY stage with a variety of stage inserts available (slides,dishes, multiwall plates, etc..).
- Olympus FV10-ASW 3.1 confocal imaging software
Imaging lasers:
- 405nm diode laser
- 488nm Argon gas laser
- 543nm Helium-neon gas laser
- 633nm Helium-neon gas laser
Objectives:
| Objective | Magnification | Immersion | Numerical Apperature | Correction Ring | Coverglass (mm) | Working Distance (mm) |
| UPlanSApo | 10X | Air | 0.4 | 0.17 | 3.1 | |
| UPlanApo | 20X | Air | 0.7 | 0.17 | 0.65 | |
| UApo | 40X | Oil | 1.35 | Corr | 0.17 | 0.1 |
| PlanApo | 60X | Water | 1.2 | Corr | 0.13-0.21 | 0.28 |
| PlanApo | 60X | Oil | 1.4 | 0.17 | 0.12 |
Delta Vision Widefield
Location: EEJMRB Room 5100

Hardware:
- Customized Olympus IX73 microscope base w/ TruLight Illuminator
- Olympus X-line PlanApo Objectives 4x, 10x, 20x Dry and 60x Oil
- Ultimate Focus laser-based autofocus system
- Custom XYZ Stage 106mm x 70mm x 7mm
- sCMOS Camera 2040 x 2040 pixels
- 7-channel solid state illuminator
- DIC Transmitted Light Imaging
- Environmental Chamber
Primary applications:
- 2D and 3D Multi-Channel Fluorescence Imaging
- 3D Restorative Deconvolution
- Time-Lapse Imaging
- Multipoint Imaging
Objectives:
| Objective | Magnification | Immersion | Numerical Aperture | Correction Ring | Coverslip (mm) | Working Distance (mm) |
| UPlanXApo | 4 | Air | 0.16 | 13 | ||
| UPlanXApo | 10 | Air | 0.4 | 0.17 |
3.1 |
|
| UPlanXApo | 20 | Air | 0.8 | 0.17 |
0.6 |
|
| UPlanXApo | 40 | Oil | 1.4 | 0.17 |
0.12 |
|
| UPlanXApo | 60 | Oil | 1.42 | 0.17 |
0.15 |
Leica Spinning Disk Confocal
Location: EEJMRB Room 5122
Hardware:
- Leica DMi8 motorized microscope with adaptive focus tracking
- ASI motorized stage with Piezo Z
- W-1 large format spinning disk confocal with beam homogenizer
- Andor 1024 x 1024 EMCCD camera
- Visitron 2D FRAP unit
- 405,488,561,640nm laser lines for DAPI, GFP, RFP, Cy5, and similar fluorochromes
- W-View image splitter for dual channel simultaneous imaging
- LED based widefield fluorescence
- Stage top incubator system
- Visiview acquisition software
Primary applications:
- 2D and 3D Multi-Channel Fluorescence Imaging
- 3D Restorative Deconvolution
- Time-Lapse Imaging
- Multipoint Imaging
- Sample images before (A) and after (B) deconvolution
Objectives:
| Objective | Magnification | Immersion | Numerical Aperture | Correction Ring | Coverglass (mm) | Working Distance (mm) |
| HC PL APO CS2 | 10 | Air | 0.4 | 2.74 | ||
| HCX PL APO CS | 20 | Air | 0.75 | 0.17 | 0.62 | |
| HC PL APO CS2 | 40 | Water | 1.1 | Corr | 0.14-0.18 | 0.65 |
| HC PL APO CS2 | 63 | Oil | 1.4 | 0.17 | 0.14 |
Nikon Ring TIRF or Spinning Disk Confocal
Location: EEJMRB Room 3532
| Objective | Magnification | Immersion | Numerical Apperature | Correction Ring | Coverglass (mm) | Working Distance (mm) |
| Plan Fluor | 10 | Air | 0.3 | 0.17 | 16 | |
| Plan Fluor | 10 | Air | 0.3 | 0.17 | 16 | |
| Plan Apo | 20 | Air | 0.75 | 0.17 | 1 | |
| Apo TIRF | 60 | Oil | 1.49 | Corr | 0.13-0.19 | 0.16-0.07 |
| Plan Apo Lambda | 60 | Oil | 1.49 | 0.17 | 0.13 | |
| Apo TIRF | 100 | Oil | 1.49 | Corr | 0.13-0.19 | 0.16-0.09 |
Image Analysis Software
Imaris, Nikon Elements, and Zen. And some recommendations for other solutions.
Overview
With our microscopes you can generate large complex multidimensional data sets. The analysis tools have to be powerful enough to deal with the data. While there is good open software for some applications, there are data sets where you may need commercial software and more powerful workstations.
Workstations: HSC Room 60, HCI Room 1470
The Cell Imaging core has two image analysis workstations for your use. These workstations have many large hard drives to accommodate image data sets. Graphics cards are installed for faster analysis. Commercial and open image processing software is installed. The workstations and software are available for reservation through the Resource Calendar.
Imaris
Imaris is made for 2D, 3D and 4D image visualization and analysis of multichannel fluorescence images. It can handle large data sets, extract objects, make measurements, and make graphics and movies for presentations and publication.
Strengths:
- Accepts any common data format for (CZI, ND2, LIF, TIFF,...) through its FileConverter.
- Handles large data sets with fast interactive response by creating a scale pyramid data structure.
- 3D and 4D data visualizations.
- Identification of image elements with Spots, Surface, Cell, and Filament tools. These tools have set up Wizards to guide in the interactive selection of analysis parameters.
- Tracking elements over time series.
- Surface tool now includes pixel classifier machine learning.
- Export of measurements to spreadsheets for further analysis.
- Internal graphing of measurements.
We have a one-seat floating license for this software. Please reserve time on the software in the Resource Calendar.
We have additional week long licenses available for rent for use on your own workstation. Please inquire with the Cell Imaging staff for more information.
A free image viewer is available for Window or Macintosh. Imaris Viewer.
Nikon Elements AR ai
Nikon Elements provides 2D, 3D and 4D image visualization of multichannel images. It provides a large set of tools for image manipulation, analysis and measurement. Analysis programs can be written as macros (a C like language) or using the General Analysis tool (a graphical programming environment). These can then be applied in batch across many images.
Strengths:
- Accepts ND2, TIFF and OME.TIFF formats.
- 2D presentation of multidimensional data sets in a clear interface.
- Volumetric presentation.
- Large set of image annotation, processing, and analysis tools.
- Programming through Macro language or graphical programming tools.
- ai (deep learning) tools for image processing (de-noise, clarify) and analysis (segmentation).
We have a one-seat floating license for this software. Please reserve time on the software in the Resource Calendar.
A free image viewer is available for Windows or Macintosh. NIS Viewer.
Zeiss Zen Desk (only at HCI 1470)
Zen provides several image visualization, image analysis, and measurement tools.
Strengths:
- Accepts CZI and TIFF formats.
- 2D presentation of multidimensional data sets in a clear interface.
- Volumetric presentation
- Image annotation, processing and analysis tools.
- Programming through saved processes.
- Option to integrate trained ai (deep learning) tools for image processing and analysis.
We have one license for this software. It is only available at HCI 1470.
A free image viewer is available for Windows. Zen-Lite. Zen-Lite also provides some image processing tools and is especially useful for image export to other formats.
First Steps - Training Procedure
Introduce rules/guidelines.
How to access the building, computer, and software; how to book the calendar; follow the SOPs; how to seek help; communication between users.
Introduce three portions of the whole imaging system.
Bulky hardware could be a power supply, control box, lasers, laser power supplies, xyz stage controller. The user should know the order of how to turn it on/off. Advanced: to recognize each box/part.
The second part is the mainframe of the microscope. Start from the Light sources, show the light path to tell upright or inverted configuration so they know how to put the sample on correctly; how many detection locations (usually four: three ports from microscope body and one is for eyepiece); main UNTOUCHED box, where the major optical components are located; how many objectives (air, water or oil immersion, advanced knowledge (features of the objective, working distance, NA, Correction…)); how many lasers, wavelength covered and how to switch channels (advanced knowledge: pulse or CW, solid-state or gas, single line or multiple lines, output energy, life span…); Epifluorescence light and how to switch channels; the right position to put samples on the stage; how to move the stage (xyz, coarse and fine); how to see the image and switch between the eye and detector; how to put a water/oil on the objective and clean the objective after you have done
The third part is the software on the computer to acquire data and transfer data.
Introduction of the software (the introduction is based on the Olympus Fluoview)
· Set up an individual account.
Log in as the Administrator, set up an individual account as “guest”?
The username format in each account is “User’s Firstname_PI last name”. The password is random. User/trainer should write this down.
· Log into a new account.
The first window (explorer):
Point out the “Jump to…” Icon
The second window (Data)
Do a quick live scan and show the data information. Introduce the memory issue if data was left in the memory
The Third Window ( Setting)
· Scanning model
· Scanning shape
· Speed, pay attention to the unit. So, a user will understand the number they are using. Explain the pros and cons why use different values
· Time indication. L, F, S
· Resolution (512x512 for general, >=1024X1024 for publication, pros and cons)
· Aspect ratio
· Rotation
· Zoom (digital zoom vs real resolution change)
· Set laser power
· Lambda measurement (don’t teach)
· Z Stack drop down menu for objective selection; while running the live imaging, click the arrow to move the objective to the top, click “set”, then move to the opposite move direction, and “go” button; move back to the middle and make sure no saturation; high-low mode, ctrl+h; select Z step (z resolution)
· Time lapse (can mention, don’t teach the detail)
The Fourth window (acquire)
· Select three light sources to observe the sample.
· For fluorescence dyes, how to add/remove channels
· The next column can briefly introduce them.
· To acquire, explain FocusX2 and why; explain XY repeat; explain “Auto HV” back to “Speed” at the third window; use XY (ZTL) to take a final imagine;
· Channels (HV, Gain and Offset)
· Pinhole size
· Transmit light intensity
· Save file to Hard drive
Hands-on and introduction to the Fifth window (Live view)
· Left: how to select window and channel
· Single window vs multiple windows
· Merge channels
· 1:1 vs Full window
Save file
· Format of the raw data (*.oib for 2D ; *.oij for 3D)
· Export data
· “Save display” function and the trick
· “Add a view” function
Play move
Do/undo Z projection and save
To browse data back to office, Olympus Fluoview viewer (link) and ImageJ (link)
Transfer data by using USB portable device
Cleaning up the water or oil on objectives.
Login Book